25 December 2010
Merry Christmas!
18 December 2010
Swedish Pancakes
 While I absolutely love the American equivalent (and the way they are served), Swedish pancakes are probably my favorite type of pancake. Maybe it's because my grandmother will make these every time I visit. Maybe it's the way you serve them. Or maybe it's just the fact that they bring me back to my childhood, when I would say, "If I had to eat one kind of food every day for the rest of my life, it'd be pancakes." I don't know. All I know is that Swedish pancakes served with whipped cream and raspberry jam is one of those simple pleasures everyone should enjoy at least once...a week.
Swedish Pancakes
3 large eggs
2.5 cups whole milk (or 2% in a pinch)
1 cup AP flour
1 tsp salt
1 tbsp butter
whipped cream
raspberry jam
Start by melting the butter. In a large bowl, mix together the eggs and half the milk. Add the flour and mix until a smooth batter is formed. Add the rest of the milk, the salt, and the melted butter.
Over medium heat, melt about a teaspoon of butter. Pour about 1/3 cup of batter into the pan and tilt the pan until it covers the whole thing. Let cook until firmed up, then flip and cook for another 30 - 45 seconds. Serve with freshly whipped cream and raspberry jam.
30 November 2010
Holiday Cocktail: Jolly Arrival
 It's the holiday season! Our Christmas tree is up, the fireplace is lit almost every night, and I get to indulge in cooking with those ingredients that are really only useful for about a month's time around the end of the year.
I came up with a drink that fits well with the holiday theme, and decided to name it Jolly Arrival (figure THAT one out). The only problem is that you can only really have one - it's almost like a dessert!
Jolly Arrival
1 oz vodka
0.5 oz Irish cream liqueur (Bailey's or similar)
0.5 oz coffee liqueur (Kahlúa or similar)
0.5 oz almond liqueur (Amaretto or similar)
0.5 oz hazelnut liqueur
0.5 oz peppermint liqueur
3 oz whole milk or heavy cream
freshly grated nutmeg
cocoa powder
Fill a cocktail glass with ice and set aside. Add ice to a cocktail shaker, and pour in all the ingredients. Shake for 5 seconds. Discard the ice in the cocktail glass and strain the contents of the shaker into the glass. Sprinkle cocoa powder and nutmeg on top. Serve immediately.
20 November 2010
Quesadillas

Quick, easy and great-tasting, I certainly adore quesadillas. The ones I make are probably nothing like the ones you’d get in Mexico, but at least they're tasty! If you make your own tortillas, the final result will be so much better, but there are plenty of decent store-bought ones out there as well. Use what works best for you!
As for the filling, I generally use shredded chicken, Monterrey Jack cheese, onion and red pepper, and top it with sour cream and some red salsa. You can really fill a quesadilla with anything you want, which is the beauty of this dish. Serve as an appetizer, a snack or even the centerpiece of a whole meal. If you do the latter, I suggest some tortilla chips and guacamole, perhaps some additional salsa and refried beans.
Quesadillas con pollo
2 tortillas (corn, flour, whole wheat, it’s your choice) – flour tortilla recipe below
1 chicken breast
1 red pepper
½ yellow onion
shredded Monterrey Jack cheese (or other soft/easy-to-melt cheese)
vegetable oil
salt
pepper
cumin
First of all, cook and shred the chicken. The easiest way to do this is to boil in salted water it for about 6-7 minutes, until cooked through. Drain, let the chicken cool slightly and shred with two forks. Next, dice the onion and cook with a little bit of vegetable oil over medium heat, until translucent (2-3 minutes). While the onion is cooking, cut up the pepper, discarding the seeds and any excessive white membrane. Add the pepper to the onion and cook for another couple of minutes, until cooked but still crunchy. At this point, add the shredded chicken and season with salt, black pepper and a little cumin.
Next, bring out your trusty cast iron pan – large enough to fit a tortilla – and set over medium heat. Add a couple of tablespoons of vegetable oil to the pan, and start building your quesadilla. On top of the first tortilla, add a layer of the chicken filling. Top with some shredded cheese, then put the other tortilla on top like a lid. Place in the pan and cook until the bottom tortilla is golden brown, about 2 minutes. Flip carefully (so you don’t lose any ingredients into the pan) and cook another minute or two, until the second tortilla is golden brown as well. You’ll want to make sure there is some pressure on top after you flip, and that is easily done with the spatula.
Use a pizza cutter to slice into wedges, and serve with some salsa and sour cream.
Flour Tortillas
4 cups all purpose flour
2 tsp salt
4 tsp baking powder
2 tbsp lard or vegetable shortening
1 ½ cups warm water
Stir together the flour, salt and baking powder in a bowl. Work the lard into the flour with your fingers, until completely incorporated. Add enough water to form a soft dough, but not so much as to make it sticky. Knead for five minutes. If you have a stand mixer, all this can be done with the paddle attachment to shape the dough, and the dough hook attachment to knead on low speed for a few minutes. Divide into portions weighing about 3 oz each, and form into balls. Let the balls rest under a towel for ten minutes.
Roll the balls into rounds, about 6 inches in diameter. Cook in a dry cast iron skillet until just starting to brown. When you do make your quesadillas later, you can actually follow the steps below, to prevent burning:
Cook one tortilla until golden brown on one side, then set aside. Cook the second tortilla until brown on one side, then flip it over. Add the filling (with the tortilla still in the pan), then place the first tortilla on top, with the non-browned side up. Flip the quesadilla over, cook until golden brown and serve immediately.
16 November 2010
Open-faced Tomato and Mozzarella Sandwiches


One of the best applications for day-old bread, in my opinion, is to top it with some good toppings and put it in the oven for a few minutes. I recently baked some bread according to the ciabatta recipe I've used before, but shaped short baguettes (bâtards) instead. The recipe below is a very simple sandwich, but providing you use high-quality ingredients, it tastes heavenly.
Open-faced Tomato and Mozzarella Sandwiches
A piece of baguette, 8-12 inches long
1 tomato
2-4 oz Mozzarella cheese
olive oil
dried oregano
dried garlic (garlic powder)
salt
black pepper
Start by turning your oven (or toaster oven) to 400 degrees F. Cut the bread lengthwise and place, cut side up, on a baking sheet. If you are unable to balance the pieces so the cut side is fairly level, you can trim the underside slightly.
Drizzle the bread with a little olive oil. Slice the tomato and cover the bread. Cut the cheese into chunks and place on top of the tomatoes. Add the herbs and spices to taste. Bake in the oven for about 15 minutes, or until cheese is bubbling and starting to brown.
08 November 2010
Video: Cocktails - Aurora, Swedish Midsummer, and Serbian Ice Tea
I finally got around to making my first video! Please enjoy the show, and find all the recipes below:
Aurora
3 oz sparkling white wine
3 oz Fresca or similar carbonated citrus drink
1 oz triple sec
1 oz vodka (optional)
Fresh raspberries, blackberries or sliced strawberries
Blend all the ingredients in a mixing glass. Pour into a chilled cocktail glass and add a couple of berries to garnish.
Swedish Midsummer
1 oz elderberry flower syrup
1 oz gin
3 oz sparkling white wine
Mix all the ingredients together and serve in a champagne glass.
Serbian Ice Tea
The recipe below is from the February 2009 post:
2 cl (2/3 oz) Malibu (or similar coconut rum)
1 cl (1/3 oz) Kalúha (or similar coffee liqueur)
2 cl (2/3 oz) Southern Comfort
2 cl (2/3 oz) peach schnapps
2 cl (2/3 oz) Triple Sec
1 cl (1/3 oz) vodka
cranberry juice
7-up or Sprite
grenadine
2 lime wedges
Add all the alcohol, the grenadine and the squeezed lime wedges in a shaker with a lot of ice. Fill up with about 5 oz (15 cl) cranberry juice. Shake.
Pour into a pint glass (with the ice and lime wedges) and top off with 7-up or Sprite.
07 November 2010
Pasta con Pancetta e Asparigi

I absolutely adore simple pasta dishes, especially the ones that look and taste like they took much more effort than they actually did. This is one of them – very simple and fast to whip up, and as long as you use high-quality ingredients (fresh is the key word here), you really can’t fail. Well, you could, but follow the instructions, and you shouldn’t!
Pasta con Pancetta e Asparagi (pasta with pancetta and asparagus)
12 oz tagliatelle (for this course, I generally use dried and not fresh/homemade and in the picture above, I actually used shells instead)
4 oz pancetta, thinly sliced
1 lb green asparagus
2 cloves garlic
1 bunch green onions
Italian parsley (flat-leaf)
½ cup heavy cream
½ cup freshly grated Parmesan cheese
1 lemon
olive oil
salt
black pepper
Start by boiling the water for the pasta, and add the tagliatelle when the water is boiling. Cook until al dente. Cut the pancetta into smaller pieces (I generally do roughly 0.5x1 inch strips) and place in a large skillet with about a tablespoon of olive oil. Cook over medium heat until crispy, and then move to a plate lined with paper towels to drain. Reserve some of the fat in the pan (not too much, about a tablespoon).
Cut the asparagus into bite-sized pieces and cook in the skillet with the reserved fat for about 3 minutes over medium-high heat. Divide the green onion into dark green and light green + white. Mince the garlic and slice the pale green and white pieces of green onion, and add to the skillet with the asparagus. Cook another two or so minutes, until vegetables are cooked through, but still crispy.
At this point, add the pancetta back to the skillet together with the parsley, and the minced dark green parts of the green onion. Drain the pasta and return to the pot, reserving a few tablespoons of the water you cooked it in. Add the contents of the skillet to the pasta, as well as the juice of the lemon, the cream, the Parmesan cheese, and about a tablespoon of olive oil. If it seems a little dry, add some of the reserved water.
Serve immediately. Add some more grated Parmesan if desired.
30 October 2010
Oatmeal Cookies

I’m back! Finally! After a couple of crazy months (wedding, new house, new car, new department at work), I’m ready to start updating the blog again. I’ve been taking some pictures of things I made recently, so that should get me started at the very least!
First up: cookies. I do apologize for the low-quality picture, but I did not have my nice camera readily available. Cell phone pictures aren’t as good, but it’s what I’ve got! Either way, I decided to make chocolate chip cookies the other day, and while I was at it, played around with some oatmeal cookies. I think I liked the latter even better than the former, so here’s the recipe! The oatmeal cookies are on the right in the picture, if that wasn't obvious.
Oatmeal Cookies with Walnuts
1 cup (2 sticks) butter, softened
1 cup white sugar
1 cup light brown sugar
2 large eggs
1 tsp vanilla extract
2 cups all-purpose flour
1 tsp baking soda
1 tsp salt
1 ½ tsp cinnamon
3 cups quick oats
½ cup chopped walnuts
First of all, turn your oven to 375 degrees F. Next, cream the butter and sugars together until very pale. I recommend doing this in a stand mixer, but a handheld one will work as well. Lowering the speed of the mixer to the slowest, add the eggs, one at the time. Next, add the remaining ingredients and stir until combined. Be careful not to over-mix!
Line a cookie sheet with parchment paper. Roll the batter into roughly golf ball-sized balls, and place them about three inches apart on the paper. Bake the cookies in the center of the oven for 10-12 minutes or until they just start to brown. Make sure you let them cool completely on a cooling rack, but don't move them for the first couple of minutes after removing from the oven – they will be quite soft and fragile, and might break.
Enjoy!
21 June 2010
40-Clove Garlic Chicken

40-clove garlic chicken is exactly what it sounds like: chicken cooked with 40 cloves of garlic (give or take). While it may sound excessive, the final result tastes great. Providing everyone around you has the same meal, nobody will notice the garlic breath you inevitably will have after eating this! I ended up serving this with oven-roasted potatoes and asparagus. The traditional recipe includes a whole chicken, quartered or cut into 8 pieces, but I decided to go with boneless chicken breasts, as that was what I had available.
40-Clove Garlic Chicken
1 lb chicken (any kind you want, but I used boneless, skinless chicken breasts)
4 garlic bulbs
bunch of fresh thyme
olive oil
salt
pepper
Start by heating the oven to 350 degrees F. Next, separate all the garlic cloves from the bulbs and peel them. The fastest way to do this is simply to smash the clove by pressing the "side" (the flat part) of your knife on top of them, and the garlic should come right out. Just make sure you don't press too hard, as you're not looking to smash the garlic, just peel it. We're not making mashed garlic here! Cut off and discard any browned parts of the garlic cloves and set aside.
Cut the chicken into roughly 1-inch pieces. Place in a large, oven-proof pot (a dutch oven works really well for this) together with about two tablespoons of olive oil. Brown over medium heat without cooking the chicken completely through. Add the garlic cloves, about 5 twigs of thyme and salt and pepper to the pot. Cover and place in the oven for 1h30m.
If you wish to serve this with potatoes, it's a good time to start preparing them as soon as the chicken goes in the oven. Peel two or three large potatoes and cut into bite-sized pieces. Place the potatoes in a roasting pan and toss with some olive oil (about two tablespoons should do it), salt, pepper and paprika. Place the potatoes in the oven (together with the chicken) and roast for the remainder of the chicken's cooking time, which will probably be closer to 1h15m at this time. Make sure you stir the potatoes occasionally, and check them when they've been in the oven for about 45 minutes to make sure they're not going to be roasted to oblivion.
If you're making asparagus, I suggest tossing the vegetables with some olive oil, salt and pepper and roasting in a shallow pan for the last 20 minutes of the chicken's cooking time.
Once all the food is ready, remove the thyme twigs from the pot and serve with a glass of red wine, a cold beer or whatever else you have available.
And, again, make sure everyone you think you'll be close to for the next day or two eats the same thing, because you'll be eating a lot of garlic!
30 May 2010
Regional Dinner Party: Spain


I've been meaning to have people over for dinner now and then, cooking a multi-course dinner from a specific region or country, and we finally had our inaugural event the other day. The first country to appear on the menu was Spain, and this was my first time cooking Spanish food other than some random odds and ends. The full menu consisted of:
- Spanish cheeses with Pan de Horno
- Cauliflower with cherry tomatoes and Serrano ham
- Paella de marisco (seafood paella)
- Bizcochos Borrachos (drunken sponge cake)
- Licor 43 con leche
Pan de Horno
1 tbsp instant yeast
3 cups warm water
7 cups unbleached all purpose flour
2 tsp salt
1/4 cup olive oil
Mix the yeast and water in a small bowl and let sit for ten minutes. Sift the flour and salt together into a large bowl. Using your fingers, mix in the oil with the flour mixture. Pour the yeast mixture into the flour mixture and stir with your fingers until the dough is firm and slightly sticky. Pour the dough onto a lightly-floured work surface and knead another two or three minutes.
Grease a bowl with olive oil and place the dough in it. Cover the bowl with a towel and leave until doubled in volume, about an hour. Once the hour is over, punch the dough down and move to a floured work surface. Knead a few seconds, then return the dough to the bowl and cover for another 15 minutes.
Cut the dough into two pieces, then form loaves. Place on a greased pan and cut slits on top of the bread. Turn the oven to 450 degrees F. Cover and let raise for 30 minutes, then bake in the oven for around 30 minutes or until the top is toasted and the loaves sound hollow when knocked on the bottom. Remove to a cooling rack and leave until completely cooled.
Cauliflower with Cherry Tomatoes and Serrano Ham
1 large head cauliflower
1/2 red onion
1/3 cup olive oil
1 cup cherry tomatoes
1/4 lb thinly-sliced Serrano ham
1 1/2 tbsp fresh lemon juice
1/4 cup finely-chopped fresh flat-leaf parsley
Start by cutting the cauliflower into 1-inch florets. Boil salted water in a large pot, then add the cauliflower florets and cook for 5 minutes or until tender. Drain in a colander and set aside. Next, cut the ham into 1-inch pieces and cut the tomatoes in half.
While the cauliflower cooks, fry the onion with the olive oil in a large frying pan over medium heat. Once the onion has turned translucent (about three minutes), add the tomatoes and ham. Cook until just heated, about two minutes. Remove from the heat and add the lemon juice and parsley. Combine with the cauliflower and serve warm or at room temperature.
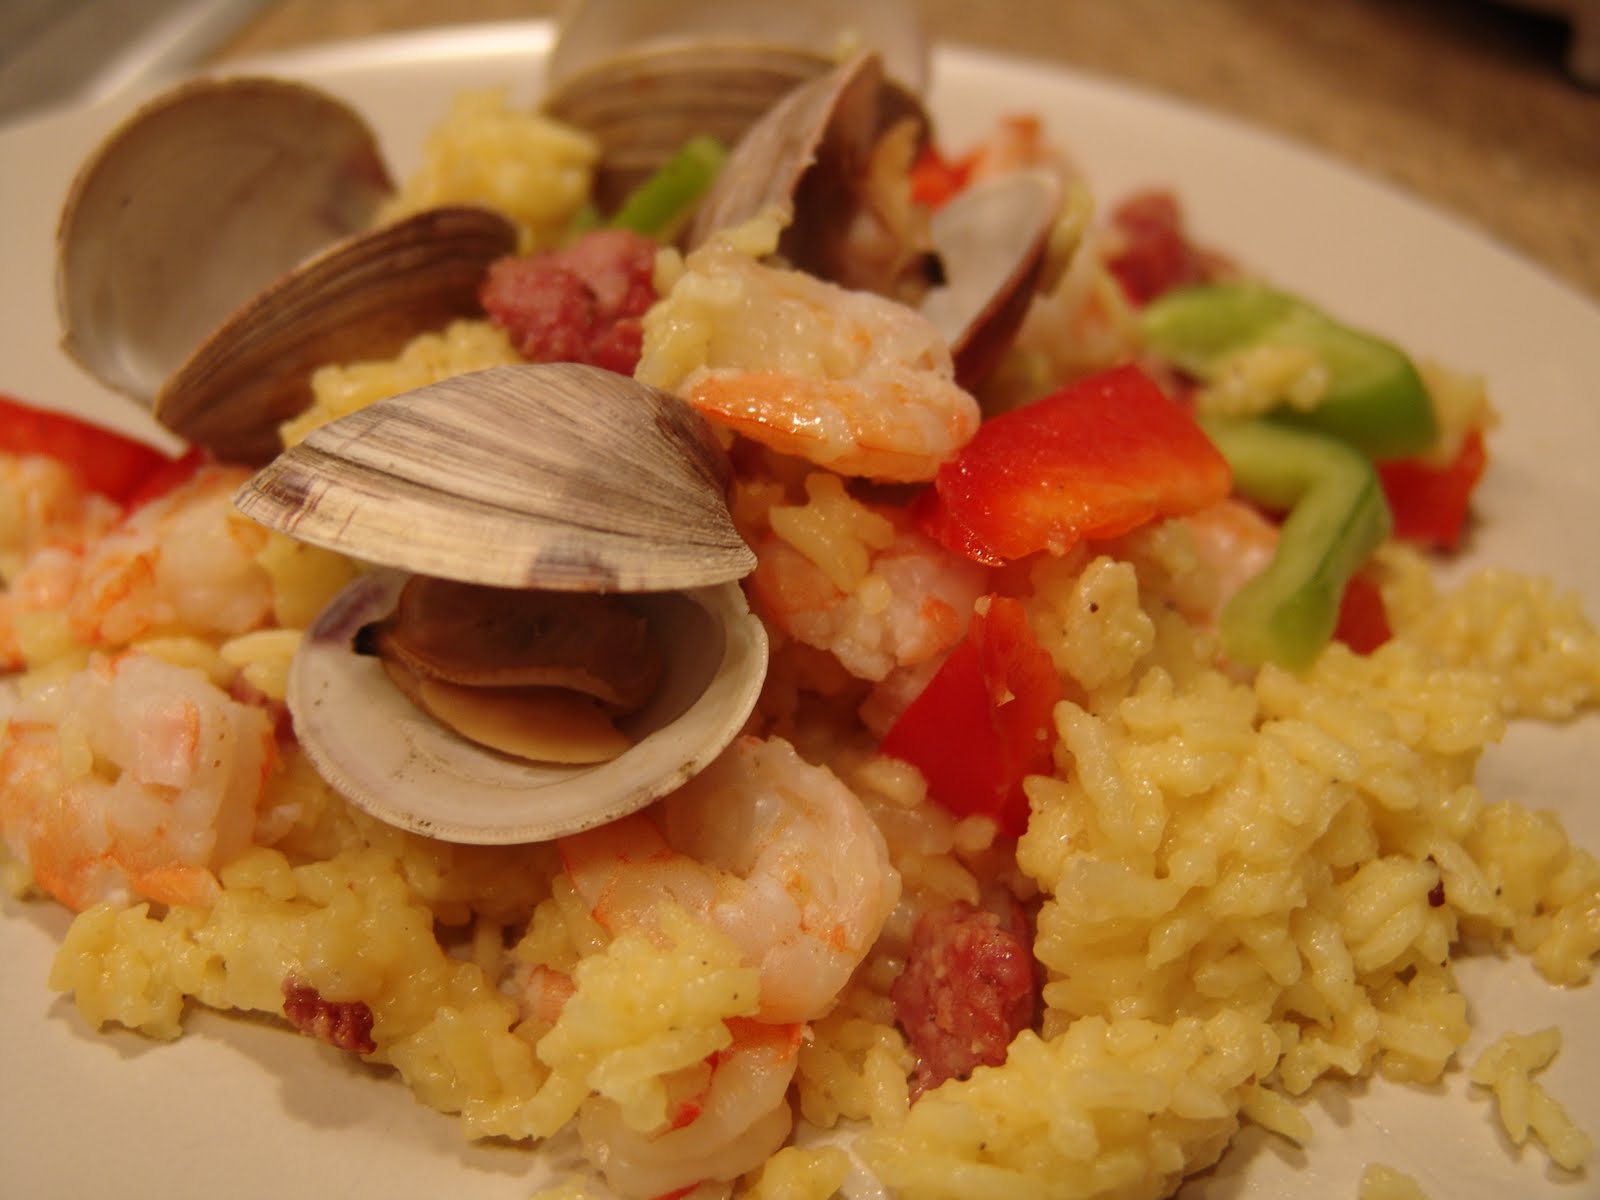
Paella de marisco
1 lb chorizo
1 lb shrimp
15 clams
15 mussels
1/2 cup white wine
1 large yellow onion
5 cloves of garlic
2 cups medium grain white rice
4 cups chicken stock
4 cups water
2 red peppers
1 green pepper
1 tsp saffron threads
1/4 cup olive oil
salt
pepper
I, unfortunately, do not have a paella pan or a pan large enough to cook a paella, so I have to resort to the oven method, which works quite well.
Start by peeling the shrimp, reserving the shells. Put the shells and four cups of water in a large pot over medium heat. Simmer for about 20 minutes, or until reduced to 2 cups. Pour through a fine mesh, reserving the liquid and discarding the shells. Set the newly-created shrimp stock aside.
Boil water in a large pot and add the shrimp. Cook for 2-3 minutes or until just cooked through. Drain and set aside. Crumble the chorizo and cook over medium heat in a large skillet. Set aside.
Clean the mussels and clams, discarding any that do not close when tapped. Add the wine to a large pot and bring to a simmer over medium heat. Add the mussels and clams, then cover. Cook for 3 to 4 minutes or until the shellfish are open, shaking the pot occassionally. Remove any mussels or clams that did not open completely, then set aside.
Turn the oven to 375 degrees F. Heat the oil in a large skillet over medium heat, then add the onion (chopped) and garlic (minced) and cook for about five minutes. Add the rice, shrimp stock, 3 cups of chicken stock, saffron, about 1 teaspoon of salt and 1 teaspoon of pepper and cover. Simmer for about 15 minutes or until the rice is al dente and some liquid remains. Transfer to an oven-safe dish, add the shrimp, chorizo, mussels and clams and cover with tin foil. Bake for 30 minutes and serve immediately.
Bizcochos Borrachos
4 eggs
1/2 cup granulated sugar
3/4 cup flour
1 tsp baking powder
1/3 cup granulated sugar
8 oz water
1.5 tbsp honey
1 1/2 oz rum
1 cinnamon stick
peel from 1/2 lemon
Turn the oven to 350 degrees F. Grease an 8-inch cake pan with vegetable shortening and flour it (add flour, shake until coated, turn upside-down to remove excess).
Separate the egg yolks from egg whites. Beat the yolks with the sugar in a medium bowl until creamy. Using a stand mixer (or electric mixer), beat the egg whites until forming soft peaks. Carefully fold the yolk mixture into the egg whites. Next, fold in the flour and baking powder. Pour the batter into the cake form and bake in the center of the oven for 20 minutes or until a toothpick inserted into the center of the cake comes out clean. Let the cake cool completely before serving.
To make the sauce, add the sugar and water to a large sauce pan and place over medium heat. Add the cinnamon stick, honey and lemon peel and let simmer for about 2 minutes, stirring occassionally. Remove from the heat, add the rum and let cool to room temperature.
Cut the cake into 9 pieces and serve each piece with a drizzle of the syrup.
Licor 43 con leche
Licor 43
milk
Licor 43 is a liqueur from Cartagena, Spain, made from citrus fruits, vanilla and a variety of other herbs and spices - 43 in total (hence the name). I served this with warm milk, as I've been told that's the way they do it in Spain. The liqueur itself also works well on its own or on the rocks.
16 May 2010
Mussels with White Wine and Garlic


I love mussels, and I realized I hadn't had any for ages - I think last time was actually when I still lived in Paris (other than in paellas and with various seafood pastas). It turns out Jacquie had only had one or two mussels in her life, but she was certainly willing to try them out. I had to go to a few different grocery stores to locate the main ingredient, but once I had the mussels ready, the recipe took less than 20 minutes to prepare (plus time for soaking and cleaning the mussels). Make sure you use a good white wine and don't skimp on the saffron!
Mussels with White Wine and Garlic
2 pounds mussels
2 tbsp unsalted butter
2 tbsp olive oil
5 medium shallots
5 garlic cloves
4 oz whole peeled tomatoes
1 packet saffron threads
1/2 cups chopped Italian flat-leaf parsley
1 cup white wine
salt
pepper
Start by soaking the mussels in a large bowl with fresh water. Mix in 1/3 cup all purpose flour or cornmeal to help with getting rid of the sand (this is especially true if you picked the mussels yourself - store bought ones are generally cleaner). After soaking, rinse and clean off any dirt and remove the "beard." The beard is the strings that may hang out from some mussels - grab it with your thumb and index finger and pull it toward the "hinge" part of the mussel to get rid of it. Make sure you discard any damaged mussels or any that aren't shut tight and won't close when you tap them. Set the mussels aside.
Chop the shallots, mince the garlic, chop the parsley and chop the (drained) tomatoes. Heat the olive oil and butter over medium heat in a large pot. Add the shallots and cook for about 4 minutes. Add the garlic and cook another 3 minutes. Add the parsley, tomatoes, saffron, wine and salt and pepper to taste. Bring to a boil over high heat, then reduce heat to medium again. Add the mussels and stir well. Cover and leave for 10 minutes. Shake the pot now and then to make sure nothing sticks to the bottom and burns, but don't remove the lid.
Discard any unopened mussels, transfer to a large bowl and serve immediately with fresh bread (baguette is pretty much unbeatable for this recipe). Just make sure you have enough bread to soak up all that wonderful broth...
02 May 2010
Chicken Parmigiana

Chicken Parmigiana (or Chicken Parmesan, as it's generally known) is one of those Italian-American staples that I had never heard of until I moved to the US. While it's not standard fare at our house, I did decide to make it recently and thought the results were good enough to post about!
Chicken Parmigiana
4 boneless, skinless chicken breast halves
1/4 cup AP flour
1 1/2 cups tomato sauce
1 cup grated Parmesan cheese
6 oz Mozzarella cheese, thinly sliced
pasta, or whatever you want to serve it with
olive oil
1 tbsp butter
salt
pepper
Start by trimming any fat off the edges of the chicken breasts. Combine the flour and a teaspoon each of salt and pepper on a plate. Coat the chicken on both sides and shake off any excess flour. Heat about two tablespoons of olive oil and the butter over medium high heat in a large skillet. Saute the chicken breasts for four minutes on one side, then flip and cook another four minutes. Remove from the heat and set aside.
When it comes to tomato sauce, everyone has his own favorite recipe. Let me rephrase that: everyone should have his own favorite recipe. Tomato sauce can make or break a recipe. Personally, I like some sweetness (I add a carrot) and prefer San Marzano tomatoes, pureed together with the water they come in (yes, canned tomatoes). Here's a promise: I'll post my tomato sauce recipe at some point in the not-too-distant future, but not right now. For this recipe, use whatever tomato sauce you can get your hands on.
Turn your oven to 350 degrees F. Grease a 13x9 baking pan and then put about 1/2 cup of the tomato sauce in there. Arrange the chicken breasts on top of the sauce, slightly overlapping. Sprinkle with 3-4 tablespoons of grated Parmesan cheese. Spoon the remaining sauce over the chicken, then cover with the Mozzarella. Top the Mozzarella with 1/2 cup of grated Parmesan. Cover the pan with aluminum foil and bake in the oven until heated through, about 30 minutes. Serve with pasta (or whatever your choice of side dish is).
26 April 2010
Tilaipa with Couscous and Salad
 I made something extremely simple, very healthy and really good the other night: pan fried tilapia, a green salad and couscous cooked partly in white wine. The meal took no more than 15 minutes from start to finish, which makes it perfect for a mid-week dinner after work.
06 April 2010
Pizza - again!

 I know this is the fourth post about pizza, but...just look at it! The last pizza recipe I posted was Alton Brown's, and while it's good, it's not as good as this. I wrote about Peter Reinhart's ciabatta recipe relatively recently, and this recipe is based on the same technique but has slightly different ingredients. Look at that crumb! It's absolutely divine.
Pizza
24 oz unbleached bread flour (roughly 5 1/3 cups)
1 tbsp coarse kosher salt
1 tsp instant yeast
1 1/2 tbsp honey
2 cups plus 2 tbsp water at room temperature
2 tbsp olive oil
Place all the ingredients in a large bowl or the bowl of a stand mixer. Mix on low speed for one minute (with the paddle attachment if using a stand mixer or with a wooden spoon if mixing by hand). Let stand for five minutes. Switch to the dough hook and mix another three minutes on medium-low speed (or mix by hand if not using stand mixer).
Transfer the dough to a lightly oiled surface. Stretch and fold the dough once, as described in the ciabatta recipe linked above. Tuck the dough into a ball, then divide into four pieces. Form each piece into a ball, then place into a separate sandwich-sized freezer bag misted with spray oil. Refrigerate overnight (or up to four days) or freeze for up to several months. If you do freeze, remove to fridge the night before baking the pizza, then follow the rest of the recipe below.
About 90 minutes before you plan to bake the pizza, remove the dough from the fridge. Stretch each piece of dough and make it into a ball, then place on a lightly oiled surface, loosely cover with plastic wrap and let rest until ready to bake. An hour before baking, place a baking stone in the lower part of the oven and turn the oven to the highest temperature it will go (usually 500 or 550 degrees F).
When ready to bake, dust the work area and each piece of dough with flour. If using a pizza peel, dust it as well (if not, the back of a sheet pan will work fine as well). Place one piece of dough on the work area, then press on the top to form a disc. Lift it and gently pull on the edges, rotating as you go, until the middle is very thin and you have a thicker edge. Place on the pizza peel and rest for 10 minutes.
Top the pizza as desired (the above photo was tomato sauce, fresh oregano and mozzarella cheese), then slide onto the baking stone and bake for about 4 minutes. Open the oven and turn the pizza, then bake another 3-7 minutes, or until crust is fully baked and cheese is browned. Remove from the oven and let cool at least a couple of minutes before slicing and serving.
30 March 2010
Buffy's Bacon Biscuits
 Our dog, Buffy, is a wonderful little dog! She's a rat terrier mix and definitely has a lot of dachshund in her, considering her length and that cute little face. Buffy, like most other dogs, loves treats. She also has a fairly sensitive stomach, so I figured making some relatively healthy dog treats from scratch might be a good idea. This recipe has bacon and bacon fat (the less healthy part), as well as whole wheat flour, which is filling and somewhat nutritious, at least.
Buffy's Bacon Biscuits
5 cups whole wheat flour
1 cup milk
1 lb bacon
1/2 cup cold water
Start by heating the oven to 350 degrees F. In a cast iron pan (or other frying pan if you don't have one), cook the bacon in batches over medium low heat. Make sure you do not empty the pan - save those drippings! Crumble the bacon into a large bowl or the bowl of a stand mixer if you have one. Add the flour and milk and mix well (use the paddle attachment if you're using the stand mixer). Switch to the dough hook and stir in the bacon drippings. While kneading, add as much cold water as needed to make a moist dough.
At this point, grease a cookie sheet. Roll the dough out until it's about 1/4 of an inch thick, in batches if necessary. Use cookie cutters or a knife to shape the biscuits. Place them about 1 inch apart on the cookie sheet and bake for 35-40 minutes in the middle of the oven.
Let cool completely, then store in an airtight container. Note that bacon fat goes rancid faster than other fats, so you may want to store these treats in the fridge.
So did she like them? I think so:
25 March 2010
Fish and Chips
 I try to eat something healthy once in a while, and this is not it. Fish and chips is definitely one of my all-time favorite meals, and having a deep fryer (albeit a toaster-sized one) in the kitchen is great. Messing with a heavy-bottomed pot and thermometers and trying to keep the temperature constant on an electric range is not my idea of a good time. If you have a gas range, you may have more luck doing so, but this meal really calls for a proper deep fryer. I recommend using peanut oil to fry the food, but safflower will work fine as well. If you want to serve this the way it's done in fish and chips shops in Britain, you'll want to use a folded up newspaper. I prefer the plate because ink and food do not go too well together.
Fish and Chips
1 lb firm-fleshed white fish - cod is recommended
2 large baking potatoes
1.5 cups unbleached all purpose flour, divided
1 bottle (12 fluid ounces/355 ml) dark or amber beer, cold
1 tsp salt
1 tsp black pepper
1 tsp baking powder
1 tsp paprika powder
peanut oil for frying
lemon wedges for serving
lettuce for service (optional)
tartar sauce (recipe below)
Begin by washing the potatoes and cutting them into uniform pieces. The thickness is up to you - I made mine about 1/2 inch thick and 3 inches long. Place in a bowl filled with cold water. Heat the oil to 325 degrees F. Pat the potatoes completely dry before frying to avoid splatter. Cook the potatoes in small batches for about 2 minutes, until pale and floppy. Remove to a plate lined with paper towels. Repeat with the other batches until all of the potatoes are done.
Turn the oven to 250 degrees F.
In a large bowl, stir together 1 cup of the flour, the baking powder, the salt, the pepper and the paprika. Add the beer and whisk until smooth. Refrigerate for at least ten minutes.
Increase the temperature of the oil to 375 degrees F. In small batches, fry the potatoes until cooked through and golden brown, about 3 minutes. Remove to a paper-lined plate, then transfer to a baking sheet and keep warm in the oven while finishing the rest of the food. Repeat until all the potatoes are cooked.
Remove the batter from the fridge. Cut the fish into chunks, roughly 2 by 5 inches. Put the remaining half cup of flour on a plate. Dip the fish strips in the flour, then in the batter. Fry until golden and cooked through, about 3 minutes. Make sure you do not overcrowd the oil. If you need to fry the fish in batches, transfer the cooked fish to the baking sheet in the oven, to keep warm.
Serve with lemon wedges, tartar sauce and some lettuce. If there are leftovers, you can reheat them in a 350 degree oven for about 15 minutes (but this dish is definitely best eaten fresh out of the fryer).
Tartar sauce
1/2 cup mayonnaise
2 tbsp pickles
1 tbsp white wine vinegar
1 tbsp capers
1 tsp coarse-grained mustard
salt
black pepper
Start by cutting the pickles into small pieces. Place all the ingredients in a food processor and pulse until the pickles are finely chopped and everything is mixed well. Keep in the fridge and use within a week.
24 March 2010
I Started Early

This is me, a "few" years ago. As you can tell, I enjoyed cooking (or at least wearing hats) and drinking (or at least holding wine glasses) from a young age! I usually tell people that I grew up under my dad's stove (not literally, though) when they ask about my interest in cooking. Well, call this proof, or something. My sister found this picture in an old photo album and uploaded it to Facebook, which is why I'm posting it here in the first place.
Poll is finished! I'll be trying to get some dishes that match the top cuisine styles (Italian, Japanese and a tie for American and Mexican in third) in the next few posts. The lemon & almond biscotti is Italian, so let's count that as the first post for the winner. New poll coming up later today, as well as a new recipe - I made fish and chips!
18 March 2010
Lemon & Almond Biscotti


Ignoring the fact that I'm posting about something sweet twice in a row (man, those muffins were good), I really love biscotti and made some tonight, so I thought I might as well update the blog as well. Biscotti, or "biscuits" in Italian (it apparently also means "twice baked"), is a wonderful hard cookie/biscuit/cracker that goes great with a cup of strong espresso or even a glass of wine. You bake a sort of loaf of the "bread" first, then divide it into smaller pieces and bake those for some additional time to create the actual cookies. This recipe includes nuts, lemon zest, and a white chocolate shell. Heavenly - and simple to make.
The current leader in the most recent poll is Italian food, so here you go!
Lemon & Almond Biscotti
2 cups unbleached AP flour
3/4 cup cornmeal
1 1/2 tsp baking powder
1 tsp salt
1 cup granulated sugar
3 eggs
zest of 3 medium lemons
3/4 cup almonds, blanched or roasted
12 oz white chocolate chips
Turn the oven to 350 degrees F. Line a baking sheet with parchment paper or a silicone baking mat.
Mix together the flour, cornmeal, baking powder and salt in a large bowl. In a different large bowl, or the bowl of a stand mixer, beat the sugar and eggs until very pale, about 2 minutes. Grate in the lemon zest and slowly add the flour mixture while beating. Stir in the almonds and let rest for at least 5 minutes.
Divide the dough in half and make two 3x9 inch "loaves" on the baking sheet. If too sticky, use wet hands. Make sure the dough has a little room to grow; don't place the loaves too close together. Bake in the middle of the oven for 30 minutes.
Once finished, remove from the oven and let cool for about 10 minutes. Next, using a serrated knife, cut the loaves into roughly 1-inch-thick slices and return to the baking sheet, cut side up. Bake an additional 25 minutes, or until golden.
Let the biscotti cool completely. Create a double boiler by barely simmering water in a pot and placing a heatproof (metal or glass) bowl over the pot - just make sure the bowl does not touch the water. Add the chocolate chips and stir until completely melted. Remove from the heat, and dip one end of each biscotti in the chocolate. Place on a cooling rack until chocolate has hardened.
These cookies will last you at least a week in an airtight container.
09 March 2010
Raspberry Muffins
 I really can't believe I haven't posted a decent muffin recipe yet! I love muffins, and maybe it's just that I eat them so quickly that there's no time to post pictures or recipes! Either way, here's one of my favorites: raspberry muffins. The muffins themselves are very simple to make but do require a special tool: the muffin pan. I have a cheap version bought at Target, and this is definitely a case where you don't need to spend hundreds of dollars (or Euros, or...I guess thousands of crowns or pesetas, or whatever you use) on a piece of kitchen equipment.
Raspberry Muffins
2 cups AP flour
1 tbsp baking powder
1/2 tsp salt
1/4 freshly grated nutmeg
2 large eggs
1 cup milk
2/3 cups sugar
1/2 cup vegetable oil
1 tsp vanilla extract
1 1/2 cups fresh raspberries
Sugar for sprinkling
Turn your oven to 400 degrees F. Grease a 12-slot muffin pan with either melted butter or vegetable oil. Cut the raspberries in half. Mix your flour, baking powder, salt and nutmeg together in a bowl. In a separate bowl, lightly beat the eggs, then add the milk, sugar, oil and vanilla extract. Using quick and light strokes, add the wet ingredients to the dry ingredients. Make sure you do not overmix, just wet the flour mix through. It's perfectly all right that the batter is lumpy at this point.
Fold in the raspberries. Divide equally into the cups in the muffin pan. Bake for 18-20 minutes, or until a toothpick inserted into a muffin comes out clean. If desired, remove the muffins from the oven after about 10 minutes and sprinkle with sugar, then let bake the remaining 8-10 minutes.
Let the muffins cool for a few minutes before moving to a cooling rack. They are best served within a few hours of cooking, but if not eating immediately, let cool completely and store in an airtight container for up to three days.
06 March 2010
Poll 1: Results
More advanced food recipes | 4 (20%) |
More basic food recipes | 7 (35%) |
Instructional videos | 8 (40%) |
Kitchen gadget reviews | 0 (0%) |
General musings about food | 1 (5%) |
Something else (comment on a random blog post!) | 0 (0%) |
I guess nobody cares about kitchen gadgets and only one person is interested in general musings about food (although I do talk about food in general in pretty much all posts). The winner, by one vote, is videos. Thanks, guys, gee, now I have to pull out the video camera and make an ass of myself on the internet. Great!
Just kidding, I've been planning to make some videos for a while, and it's not a bad idea at all. Easier to show than to type out what you need to do in order to succeed, right?
Basic food recipes is the runner-up, so maybe I'll combine those two...we'll see. Expect the poll results to affect the blog in the coming weeks. And don't worry, people who wanted to see more advanced recipes, I'm not tied to the poll results like a boat to a dock (for lack of a better analogy), I'll be posting some more advanced stuff too for sure!
New poll posted. What's your favorite cuisine (out of those posted)?
04 March 2010
Tiramisù


Tiramisu is one of those classic desserts that you can find in pretty much any Italian restaurant. It's delicious, it's decadent, and it's definitely not for people who are trying to lose a lot of weight...but it's absolutely wonderful and even if it tastes like it's very hard to make, it's actually not that difficult. I made some recently, and even if we had a piece each pretty much every night, Jacquie asked me to make more as soon as we ran out. So, I made some more tonight. As a matter of fact, I'm having some right now. Jealous? Well, go make your own!
Tiramisù
30 ladyfinger cookies
5 egg yolks
2/3 cup sugar, divided
1/3 cup sweet Marsala wine
1 tbsp water
12 oz mascarpone
1/2 cup heavy cream
2 teaspoons vanilla extract
1 cup espresso or strong black coffee, cooled
2 tbsp rum
4 oz semi-sweet chocolate
Turn the oven to 350 degrees F. Arrange all the ladyfingers on a cookie sheet. Once the oven is hot enough, bake the ladyfingers for about 10 minutes or until lightly browned. In the meantime, beat the egg yolks and 1/3 cup of sugar in a heatproof bowl with an electric mixer until very pale and creamy. Add the Marsala wine and water, then set the bowl in a skillet over about 1 inch of barely simmering water and beat constantly until roughly doubled in volume and the temperature reaches 160 degrees F.
Whip the (softened) mascarpone together with the cream and vanilla until soft peaks form. Let the egg/sugar mixture cool completely, then fold it in with the mascarpone mixture. Mix together the coffee, the rum and the other 1/3 cup of sugar. Dip half the ladyfingers, one by one, in the coffee mixture and place in a single layer in the bottom of a dish (large enough to hold two layers of ladyfingers plus the filling). Spread half the mascarpone mixture on top of the ladyfingers. Next, add the semi-sweet chocolate. You can either grate it finely or just put it in a blender or food processor and run it on high for about 5-7 seconds. Sprinkle about half the chocolate on top of the mascarpone mixture. Repeat with the second layer of ladyfingers, mascarpone mixture and chocolate.
Cover and refrigerate for at least one hour before consuming (it gets better after 2 hours, and I recommend eating within 4 hours for the best results). Will keep for at least three days in the fridge, covered, but if you manage to keep it for that long, you're a better man than I.
27 February 2010
Overhaul...and let's try a poll
This blog may have a lot of interesting recipes and decent food photography - but the layout is pretty plain. I'm working with a friend to spice it up a little bit, so expect to see some major updates in the coming days/weeks.
I've also decided to start polling my loyal readers (and random visitors) on various things. First up: what would you like to see more of on the blog? The poll is on the right, and I'll listen to your answers. If you want to comment specifically, let me know in this post, or any random post!
25 February 2010
Tuna Salad
 The title of this post should probably have been "Tuna Salad Salad" since that is technically what I made, but the second "salad" part was pretty much just lettuce and some cheese, so I'll stick with the part that actually requires a recipe to make.
There's a Swedish saying - nöden har ingen lag - which basically means "necessity has no law" or something like that. The necessity, in this case, was for food and there was nothing directly unlawful with what we did to stifle our hunger, but the saying came to mind anyway. We were hungry and didn't have the energy to go grocery shopping, so we checked what we had in our fridge and pantry, found some tuna and other delicious ingredients and made tuna salad!
Tuna Salad
1 6 oz tin tuna in water
1/2 cup mayonnaise
2 stalks celery
1/2 small yellow onion
15 red grapes
1 clove garlic
1/2 apple (whatever kind you like)
1 tsp lemon juice
Start by draining the tuna thoroughly. I emptied the tin in a strainer/sifter and applied a little pressure with a fork to get rid of the water. Put the tuna in a medium bowl and set aside. Finely chop the celery and onion. Finely mince the garlic. Halve the grapes and cut the apple into small pieces. Add everything but the lemon juice to the tuna and stir thoroughly to combine. Cover with plastic wrap and place the salad in the fridge for at least 20 minutes, to chill. Remove from the fridge and stir in the lemon juice.
Serve on fresh bread (preferably whole wheat) or on top of your favorite kind of lettuce. If you do the salad option, sprinkling some form of shredded cheese works great (I recommend Monterrey jack or mozzarella).
23 February 2010
Cinnamon Rolls

 There's a pretty major difference between the cinnamon rolls I remember from my childhood in Sweden and what I'm used to seeing in bakeries or, for that matter, in U.S. homes. Not that I've been offered cinnamon rolls in any U.S. homes lately, but I've just never seen the smaller Swedish version anywhere else. We call them kanelbulle, which means "cinnamon bun," more or less.
These cinnamon rolls are, as the picture may have already told you, more in the style of what you'd find in a bakery (or a U.S. home, I guess). Either way, they are delicious and I recommend you go make them right now!
Cinnamon Rolls
28 oz (roughly 6 cups) unbleached all purpose flour
2 tsp salt
1/2 cup + 6 tbsp sugar
5 tsp active dry yeast
2 cups + 2 tbsp whole milk
1/2 cup + 2 tbsp melted butter
2 tbsp cinnamon
1/2 cup sugar
Start by heating the milk until it is about 100 degrees F. Combine the flour, salt and 6 tbsp sugar in a mixing bowl. In a separate bowl, whisk together the yeast and the milk until the yeast is completely dissolved. Pour the mixture over the dry ingredients together with the 1/2 cup of melter butter, then stir - use the paddle attachment if using a stand mixer, or a large spoon if you don't have the mixer (and if you don't, get one - seriously, best piece of kitchen equipment I've ever owned). Mix for about a minute, until the dough forms a ball.
If using the stand mixer, switch to the dough hook and mix for another five minutes, on medium speed (if you have no mixer, now is the time to switch to using your hands and kneading for five minutes instead). Add milk or flour to create a soft, tacky dough - not sticky.
Place the dough in an oiled bowl, cover tightly and refrigerate overnight.
The next day, remove the dough from the fridge about 3 hours before it's time to bake. Once the three hours have passed, divide the dough in two equal pieces and let rest, loosely covered by plastic wrap, for 20 minutes.
Next, place one piece of dough on a floured work surface. Using a rolling pin, roll the dough into a 12-by-15 inch rectangle (30x40cm, roughly). Melt the remaining butter (2 tbsp), and brush it evenly over the dough - you may end up using more than 2 tablespoons for the two pieces of dough. That's fine, just don't put so much butter on the dough that you create pools of the stuff! Whisk together the cinnamon and the remaining sugar (1/2 cup), then evenly sprinkle the mixture over the dough, making sure to leave about 1/2 inch (about 1.5 cm) around the border.
Next, roll the dough lengthwise like a rug, as tightly as possible. Once you have a "log" or "rug" ready, cut 1-inch pieces and place them on a cookie sheet covered with parchment paper. Make sure you leave about an inch of space between each roll, as they will expand greatly while rising and baking. Cover loosely with plastic wrap or a clean kitchen towel, then leave to rise for two hours. Repeat with the other piece of dough.
When you're almost ready to bake, turn the oven to 350 degrees F (175 degrees C). Bake the rolls in the center of the oven for 10 minutes, then turn the pan 180 degrees and bake another 10-15 minutes, or until golden brown and delicious.
In the meantime, make some topping!
Sift 4 cups of powdered sugar into a bowl. Add 1 teaspoon of vanilla extract and 1/2 cup of milk, then whisk until smooth. You may need to add a little more sugar if the glaze is too "watery" (milky?) - it should have the same consistency as pancake batter.
Once the buns are ready, let them cool for about five minutes, then drizzle as much glaze as you want over them. Let cool a little longer before eating, if you can manage. Once the buns are cool, make sure you place them in an airtight container as soon as possible to prevent them from drying out.
Oh, and enjoy them with a glass of milk. It's the only way! (I generally drink coffee with the buns, but that's because coffee is awesome and fantastic and the best.)