21 July 2014

Blueberry Lemon Coffee Cake


A coffee cake contains no coffee and does not require the company of a cup of coffee when being ingested. That shouldn't stop you from making it and eating it, though. Just make sure you have plenty of coffee available. Not because it requires it, just because coffee should always be readily available. Coffee is the best. Did I mention coffee? Coffee.

Where was I? Ah, right, the coffee cake: A simple, non-yeasted (although there are versions that contain yeast) cake that is quick to whip together and contains mostly ingredients you probably have in your fridge and pantry anyway. A great alternative to pancakes or whatever other breakfast foods you might be cooking on a Sunday morning, it can also be served as a snack with your afternoon coffee. Mmm, coffee.

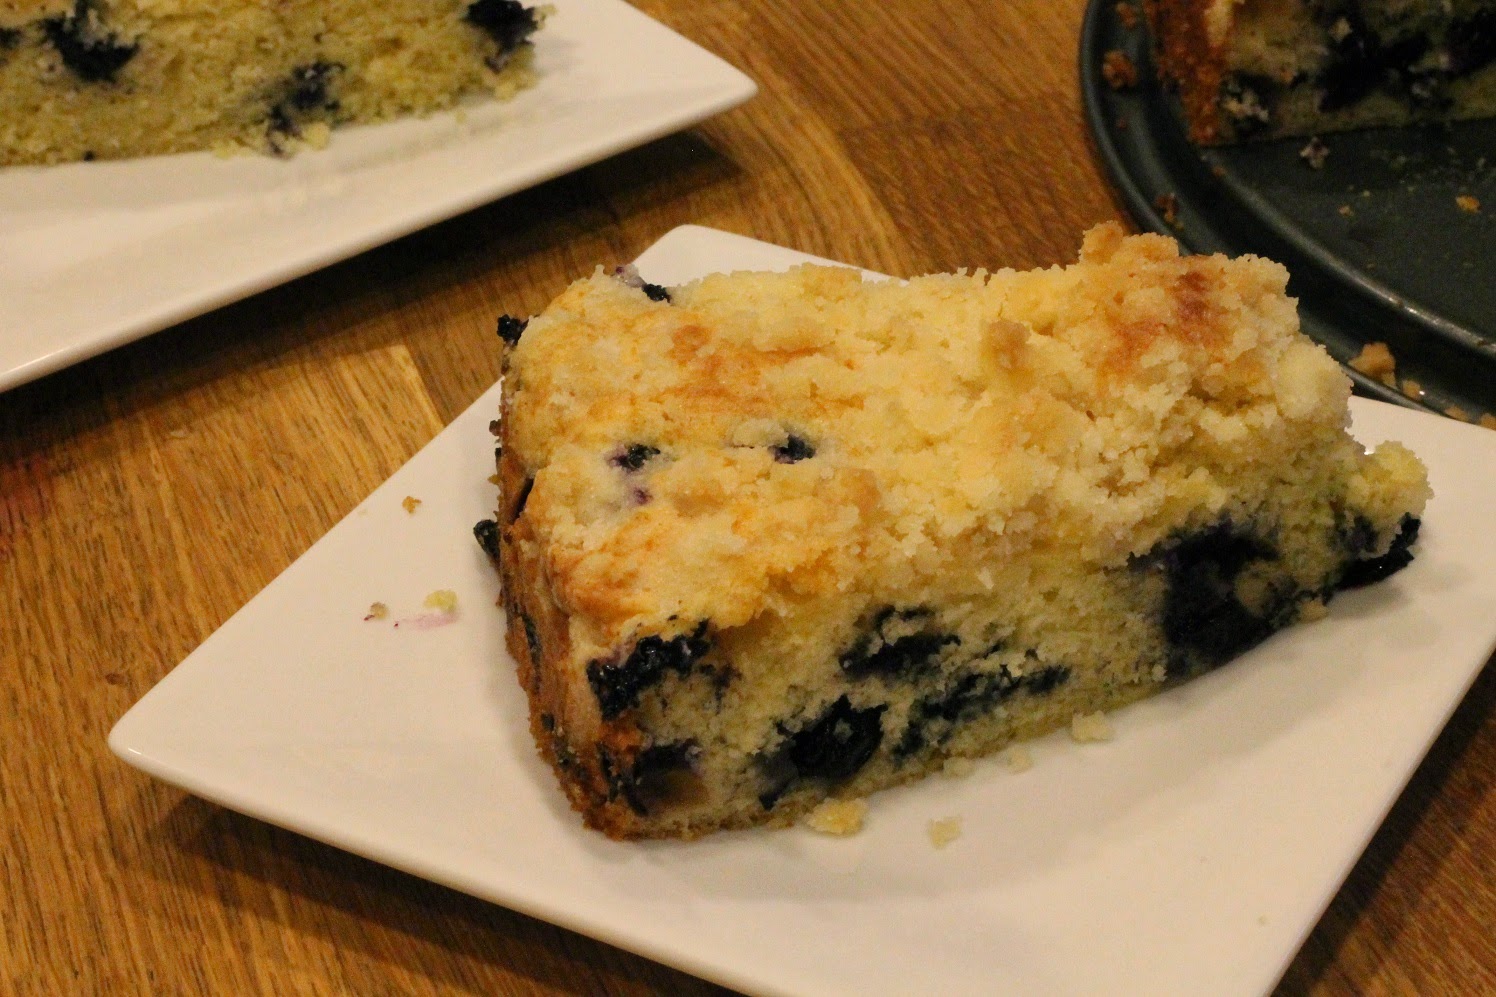
This version has blueberries, but they could easily be replaced with any other kind of berry you like (raspberries, blackberries, sliced strawberries, or a mix).

Blueberry Coffee Cake

2 cups flour
1/2 tsp salt
2 tsp baking powder
1 stick (1/2 cup) butter
1 cup sugar
2 eggs
1 1/2 tsp vanilla extract
1/2 cup milk
zest of one lemon
8 oz (about 2 cups) fresh blueberries

Topping

3 tbsp butter
1/2 cup sugar
1/4 cup flour

1. Start by heating the oven to 350 degrees F. Spray a 9-inch round springform pan with cooking spray and set aside.

2. Sift together the flour, salt, and baking powder into a bowl.

3. In a separate bowl (or using a stand mixer with the flat beater), whip together the butter and sugar until very light and fluffy.

4. Add the eggs, vanilla extract, milk, and lemon zest to the butter mixture and mix until combined.

5. Add the flour mixture to the butter mixture and mix together swiftly. Make sure you don't over mix this - it's important not to start developing a lot of gluten. Some clumps of flour is perfectly fine.

6. Mix in the blueberries and pour the batter into the prepared pan, ensuring the top is smooth and level.

7. Melt the 3 tbsp of butter and pour into a small bowl. Add the 1/2 cup sugar and 1/4 cup flour and mix until crumbly.

8. Sprinkle the crumbled topping over the batter and bake in the oven for about 50 minutes or until a toothpick inserted in the center comes out clean.

9. Remove the cake from the oven and let cool at least 15 minutes, then run a knife along the edges of the cake and remove the edge of the springform pan.

10. Serve the cake warm or at room temperature. Store any leftovers in plastic wrap or foil at room temperature for up to three days. I like to reheat a slice of cake in the microwave for 15 seconds at ~50% power.

05 July 2014

Lemonade

It's the 4th of July, and what's more American than lemonade? Lemonade with vodka, of course! I posted a recipe for lemonade five years ago, and while it's still viable, I've made some changes and updated it a little bit. Living in Southern California now, local lemons are available more or less all year, and they make a drink like this even better!

Happy Independence Day, everyone!

Lemonade

1 1/2 cups freshly-squeezed lemon juice
2 cups granulated sugar
8 cups water

1. Stir the sugar and one cup of the water together in a small saucepan over medium-high heat. Cook, stirring frequently, until the sugar has melted into the water, about 2 minutes.

2. Allow the syrup to cool to room temperature.

3. In a large pitcher, mix the remaining 7 cups of water with the syrup and lemon juice.

This lemonade will keep in the fridge for at least a month. Mix it with vodka or maybe some bourbon and some fresh mint leaves. You could always drink it plain on the rocks as well, but where's the fun in that?

26 May 2014

Baking Day


Today is Memorial Day in the US and I was off work. I decided to spend the day baking and here's the result! Clockwise from left, ciabatta, cinnamon rolls, and kuvertbröd.

Yum.

24 May 2014

Insalata Caprese


I'm aware that I've been away from the blog for far too long, and for that, I apologize. I have a few posts lined up now, though, so stay tuned in the coming weeks for some new recipes!

The classic Insalata Caprese (literally "Salad of Capri," Capri being an island just off the coast of Naples in Italy) is simple to make but, as long as you use good ingredients, tastes far better than the sum of its parts. Make this when the tomatoes are fresh and use a really good mozzarella cheese and you're in for a real treat.

The star of the dish is most definitely the tomato. I used simple "on the vine" tomatoes, but you can use Roma/plum tomatoes, heirloom tomatoes, or even small cocktail tomatoes for the salad. The latter two are sweeter than the standard supermarket tomato, so you may need to add a little extra salt to balance the dish.

Traditionally, a Caprese salad contains tomato, mozzarella, basil, olive oil, and salt. I like to add a good aged balsamic vinegar, some red onion, and some freshly cracked ground pepper to the dish. While the salad is traditionally served as a starter, we had it as a main course the other day, accompanied by garlic bread and oven roasted potatoes. Simple and wonderful.

Insalata Caprese (Caprese Salad)

1 lb ripe tomatoes
10 oz fresh mozzarella cheese
1/4 red onion
1 bunch fresh basil
extra virgin olive oil
aged balsamic vinegar
salt
black pepper

1. Slice the tomatoes into 1/4 inch slices.
2. Cut the cheese into bite-sized pieces.
3. Pick the basil leaves off the stem.
4. Finely slice the red onion.
5. Arrange the tomatoes, mozzarella, and basil on plates and sprinkle the red onion on top.
6. Salt and pepper to taste.
7. Lightly sprinkle with the olive oil and vinegar.

Serve immediately with some good bread. I would recommend something Italian, like ciabatta!

09 March 2014

Steak au Poivre


I could probably eat steak every day. I know red meat isn't great for you and it would get pretty expensive (I only buy "good" meat from stores like Whole Foods because they are strict with what kind of treatment the animals received). There's just so much you can do with a good steak - from just grilling or frying it and serving it as is to slicing it up and putting it on a bed of salad to grinding it and making burgers. I could probably deal with being a vegetarian if I felt so inclined, but I think I would miss eating steak the most.

So, I decided to make steak. "Steak au poivre" means "pepper steak" in French, and, boy, there's a lot of pepper on this thing. It's earthy and a little spicy, but, thanks to the sauce, it's creamy, delicious, and just heavenly. I served it with mashed potatoes and oven roasted asparagus. I would also recommend oven roasted potatoes or pretty much any roasted root vegetable. The recipe below is for one person; double the quantities for two and so on.


Steak au Poivre

1 piece of steak (I used a New York strip but a filet or rib eye will do just fine)
1 tbsp black pepper
1/4 cup brandy
1/2 cup heavy cream
1 tbsp butter
1 tbsp canola oil
salt

1. An hour before cooking, remove your steak from the fridge. Remove any big pieces of fat, salt liberally on all sides, and let rest at room temperature. Yes, your steak will be fine for an hour, but don't leave it out much longer than that.

2. Once the hour is almost up, crush the peppercorns with a mortar and pestle (or something heavy, like a frying pan) until coarse - we want large pieces, not ground pepper. Spread the pepper on a plate and coat the surface of both sides of the steak by pressing it into the pepper.

3. Over medium heat, melt the butter and oil in a cast iron skillet until it starts turning golden. Add the steak and don't touch it for four minutes. Flip, and cook another four minutes without touching it for medium rare, depending on the thickness of your steak.

4. Remove the steak to a plate and cover loosely with foil. Pour off the grease from the pan, trying to not lose any of the residual pepper.

5. With the pan off the heat (this is important), add the brandy. Light the brandy with a match (trying not to singe your eyebrows in the process) and let the flames die down. Add the cream to the pan, turn the heat back on, and set to medium low. Cook for about three minutes or until the sauce thickens slightly.

5. Add the steak back into the sauce and coat with the sauce. Place the steak on a plate with whatever side dishes you opted for and pour the remaining sauce over it. Devour.

27 February 2014

Leek & Potato Soup


Ah, the leek. It's one of those vegetables that are fairly challenging to grow because it takes a lot of patience, care, and, above all, space to succeed. I don't grow my own (a balcony is no place for a leek to grow), but I'm basically saying that I don't envy those that do. When purchasing leeks at the store, try to get the ones with as much of the white part as possible because that's essentially the part you eat. Sure, the rest has its uses (mostly for making vegetable stock), but the white part is where the flavor and consistency you're looking for lives.

Mixing leeks with potatoes and adding stock, cream, and potentially some other ingredients is called a Vichyssoise and it is apparently either a French or an American invention. There seems to be some debate regarding the fact. I don't really care; I just think it's super tasty. While a proper Vichyssoise is served cold and contains onions and no buttermilk (only cream), I like the version found here better. It's lighter, it's good both cold and hot (I prefer mine hot), and it has a certain...je ne sais quoi.

Leek & Potato Soup

1 lb leeks
1 lb potatoes
1 quart vegetable stock (preferably homemade - if not, low salt)
1 cup heavy cream
1 cup buttermilk (can be substituted with a second cup of heavy cream)
3 tbsp unsalted butter
salt
white pepper
chives

1. Cut off the dark green parts of the leeks, leaving only the white parts (including the roots) and the light green parts.

2. Cut the leeks lengthwise all the way down to the roots, leaving about 1/2 inch. This makes them a lot easier to wash because you're going to want to get rid of the dirt that may be trapped under the outermost leaves.

3. Once cleaned, cut off and discard the roots, then cut the leeks into small pieces.

4. In a large pot, melt the butter over medium heat and add the leeks and a pinch of salt.

5. Sweat over medium heat for 5 minutes, stirring occasionally, then lower the heat to medium low and cook until the leeks are tender, about 20 minutes. Continue stirring occasionally.

6. While the leeks are cooking, peel and cut the potatoes into small pieces. Note that the potatoes brown quickly if left in the open air, so I generally soak them in water (or in the vegetable stock).

7. Once the leeks are tender, add the potatoes and vegetable stock and raise the heat to high.

8. Once the soup is boiling, turn the heat to low, cover, and simmer for about 40 minutes or until the potatoes are fork tender.

9. Remove the soup from the heat and puree with a stick blender or in a food processor. If using a food processor, be very careful as the soup is hot - placing a towel on top of the lid helps.

10. Once completely smooth, stir in the cream, buttermilk, and about 1/2 tsp of white pepper, then return to low heat. Slowly heat, stirring frequently, until hot enough to eat. Alternatively, let cool down completely and serve cool.

11. Slice some chives and sprinkle over the top. Serve with crusty bread and white wine.

The soup will last three days in the fridge or three months in the freezer. Reheat in a pot on the stove over low heat.

16 February 2014

Kuvertbröd - Swedish Dinner Rolls


My grandmother, who passed away about a year ago, was a great cook and baker. I will always cherish the memories of having lunch at my grandparents' house because I knew I would get either meatballs or pancakes, which, to a Swedish kid, are about the best things you can eat in the whole world. One thing I had forgotten she baked (until my mother reminded me last Christmas) are these kuvertbröd - literally "envelope bread." At least that's what I thought all my life, until writing this blog post made me think, "That's a weird name for a piece of bread that looks nothing like an envelope." That's when it hit me: A kuvert in Swedish can mean both an envelope and a place setting (i.e., the plate and all the things that go with it - cutlery, napkin, glass, and whatever else). Using my Swedish brain even more (it's been a while since I spoke Swedish with any regularity), I recalled that you would use the word when talking about how many people would be coming to a dinner party.

With all this knowledge flooding back, I realized why these awesome little dinner roll-like pieces of bread are called what they are: They're individual servings that go perfectly with your dinner without having to share or slice bread. A cursory Google search proved me right: The name stems from the fact that they are for the individual and not for sharing with others around the dinner table. Bork, bork, bork!

Recently, I've found myself using these rolls for breakfast. I know that may sound weird to anyone in the U.S. reading this, but in Sweden, having a sandwich (we call it a macka) for breakfast is perfectly normal. We generally top ours with butter, Swedish cheese (which I currently purchase at IKEA), and maybe a slice of cucumber or tomato. A future blog post will feature the macka - I promise - and it's as Swedish as Absolut Vodka and ABBA. Read the Dragon Tattoo books and you'll find that they're having coffee and mackor (plural of macka) on every other page!

Anyway! This recipe is easy but made way easier with a stand mixer. It makes 24 rolls, and they freeze really well.

Kuvertbröd - Swedish Dinner Rolls

5 cups AP flour
50 g (about 3.5 tbsp) unsalted butter
2 tbsp active dry yeast
2 cups + 1 tbsp whole milk
1 tbsp white sugar
2 tsp salt
1 egg

1. Melt the butter in a small pot over low heat.

2. While the butter is melting, mix the flour, yeast, sugar, and salt in the bowl of a stand mixer.

3. When the butter has melted, add the milk and heat to 118 degrees F (48 degrees C).

4. Add the milk/butter mixture to the dry ingredients and knead with the dough hook for 5 minutes. If not using a stand mixer, mix with a wooden spoon until everything comes together, then knead with your hands for 5 minutes.

5. Place the dough in a lightly floured bowl - it's likely pretty sticky at this point. Let rest under a kitchen towel for 30 minutes.

6. Turn your oven to 480 degrees F (250 degrees C).

7. Punch the dough down and divide into 24 equal parts - I use a kitchen scale for this. If you don't have a kitchen scale (digital), go get one. So useful.

8. Roll each piece of dough into a ball between the palms of your hands and place on a baking sheet, leaving about 2 inches of space between each piece.

9. Cover the dough with a kitchen towel and let rest another 30 minutes.

10. Crack the egg into a bowl and lightly whip with a fork.

11. Lightly brush each roll with the egg and sprinkle a little bit of sea salt on top. Alternatively, you can sprinkle with sesame seeds or black poppy seeds. Or just omit the sprinkling of anything at all.

12. Bake in the middle of the oven for 10 minutes or until golden brown.

13. Let rest on a cooling rack until cool enough to touch before cutting in half, slathering with butter, and trying not to eat too many in one sitting.

Once completely cooled, you can freeze the rolls in a Ziploc back for up to six months. While they can be toasted, I prefer mine not to be. Instead, I microwave a roll for 30 seconds on low power, then cut in half and microwave again on medium power for about 10 seconds. Your results may vary depending on your microwave, and you need to experiment with the timing if you're defrosting more than one roll at a time.

10 February 2014

Chocolate Coffee Cookies


I love cookies. The chocolate chip cookie recipe I've posted in the past is a staple, and I try to bake them pretty frequently - my wife and all of our respective coworkers seem to appreciate it when I do. While chocolate chip is awesome, you can really make a more interesting dough than just a butter/flour/sugar mix. Case in point: I made cookies that do contain chocolate chips but also have two more of my favorite things in the dough itself: coffee and alcohol. Chocolate coffee cookies!

Chocolate Coffee Cookies

2 cups + 2 tbsp (9.6 oz) AP flour
1/4 cup cocoa powder
3 tbsp instant coffee powder
1/4 tsp sea salt + more for topping
1/2 tsp baking soda
1 cup brown sugar
1/2 cup granulated white sugar
1 stick (8 tbsp) unsalted butter
1 egg + 1 egg yolk
2 tsp vanilla extract
1/4 cup coffee liqueur (like Kahlúa)
1 cup chocolate chips (I used a mix of dark chocolate and white chocolate chips)

1. Melt the butter over low heat in a small pan (or in the microwave) and let cool for at least ten minutes.

2. Mix the flour, coffee powder, salt, baking soda, and cocoa in a bowl.

3. In a separate bowl, mix the butter and sugars until combined.

4. Add the coffee liqueur to the butter mixture and mix thoroughly.

5. Add the flour to the butter mixture gradually and completely incorporate.

6. Fold in the chocolate chips.

7. Wrap the dough in plastic and refrigerate for an hour.

8. About 20 minutes before removing the dough from the fridge, turn your oven to 325 degrees F.

9. Remove the dough from the fridge and shape into 1.5-inch balls.

10. Place the balls on a parchment paper-lined baking sheet, leaving about 2 inches between each ball, and sprinkle with sea salt.

11. Bake for about 12 minutes or until the edges are set (the center may not be completely set).

12. Remove from the oven and let cool slightly before moving to a cooling rack to cool completely.

27 January 2014

Tagliatelle with Charred Corn and Cheese


My wife and I got married in 2010 and spent our honeymoon in one of our favorite places in the world: New York City. One of the coolest things about New York is obviously its wealth of excellent places to eat and drink, and we visited a few real gems when we were there. One of them was Mario Batali's eatery Babbo next to Washington Square Park. We made the (what turned out to be) poor decision of going for the pasta tasting menu with wine pairing. It was a poor decision because there were five courses of pasta and three desserts, each with a glass of wine. I don't think I've ever been so full in my life, and I hit a plateau of fullness sometime around course number three. The rest of the evening is a blur, but I distinctly remember being very sad I couldn't eat everything in front of me.

The first course that night - black tagliatelle with charred corn, a light cream sauce, and cheese - was the most memorable to us both. It was delightful: light, creamy, salty, sweet, just an amazing (and simple) collection of flavors. I recently decided to try to recreate the course and, as you can see in the picture above, did not make black tagliatelle. I wanted to make it right away and did not have the patience to wait for an order to arrive (Amazon sells squid ink as well as squid ink pasta), but I do recommend using it as the difference in color makes the dish pop visually in a completely different way than what I made.

Tagliatelle with Charred Corn and Cheese

1 lb tagliatelle, preferably colored by squid ink
2 ears of corn
1 tbsp butter
3 tbsp dry white wine
1 cup heavy cream
2 cloves garlic
1 bunch chives
Castelmagno cheese (can be replaced with Parmesan - I used Cotija for this recipe)
vegetable oil
salt
black pepper

1. Char the corn. You can do this on a grill (preferred) or under your broiler. Brush some vegetable oil on them, sprinkle with some salt, and place on the grill, turning frequently until the corn is blistered. If using a broiler, place the corn in a broiler safe pan, place as close to the heating element as possible, and turn frequently until blistered.

2. Using a sharp knife, cut the corn off the cob and place in a bowl. Cover with paper towels to keep somewhat warm.

3. Bring a large pot of water to a rolling boil over high heat. Add two tablespoons of salt (you want your pasta water to be as salty as sea water).

4. In a medium saucepan, melt the butter over medium heat. Mince the garlic and add to the pan when the butter has melted. Cook the garlic until soft but do not let it get any color - this should take less than two minutes.

5. Add the wine and reduce to about 1/2 the original volume, which should take about two minutes.

6. Add the cream to the saucepan and increase the heat to medium high, bringing it to a simmer. Simmer the cream for about five minutes or until thick enough to coat a spoon.

7. Once the pasta is done cooking, drain and add to the cream sauce. Stir to coat.

8. Plate the pasta with the sauce, top with the corn and shave the cheese over the top. Slice the chives into 1-inch pieces and place on top. Enjoy with a robust white wine.

17 January 2014

Pan Pizza


As we've previously established, I love pizza. I love pizza so very much. Notice how much better they look over time, too! All the pizzas I've made in the past have been of the so-called New York-style, or I suppose you could call them Neapolitan-style. Thin crust, fairly sparse toppings, lots of blistering in the dough. On the other side of the spectrum, I suppose you would find Chicago-style deep-dish pizza, which I think is more like a casserole than pizza, but hey - to each his own. Even Anthony Bourdain admits that deep-dish pizza is more than edible; it can actually be good.

In between New York and Chicago lies the magical land of Pizza Hut, Papa John's, Domino's, and whatever else have you: the pan pizza. I'm obviously joking when I call any of these chain "restaurants" magical, but pan pizza can be good. I especially like ordering Pizza Hut on a lazy Sunday afternoon when the Saturday night is a haze and I don't have the stamina to boil an egg. Pan pizza has a fairly thick crust, is not blistered like a thin crust should be, and generally has more toppings and more stringy cheese than a New York-style pizza. So, how hard is it to make one at home? As it turns out, not very.

This recipe makes two 10-inch pizza pies. The dough can be kept in the fridge for three to four days or frozen for up to six months. If you have leftovers, the baked pizza can be kept in the fridge for three or so days.

Pan Pizza

14 oz (about 2.5 cups) bread flour
2 tsp kosher salt
1/2 tsp instant yeast
9.5 oz (1 cup + 3 tbsp) water at room temperature
2 tsp good quality olive oil
2 cups tomato sauce
mozzarella cheese (not fresh; dry or "low moisture" works best)
whatever toppings you want!

1. Mix the flour, salt, yeast, water, and oil together in a large bowl. You do not need to knead this; just ensure all the flour is wet. Cover with plastic wrap and let stand at room temperature for eight hours.

2. Transfer the dough to a floured work surface. Sprinkle some flour on top and then cut the dough in half with a sharp knife.

3. Shape each piece of dough into a ball and roll it on the work surface to make a tight "skin." If you're not making two pizzas right now, transfer one piece of dough to a Ziploc back that you've greased with a little bit of oil. Place in the freezer for long-term storage or in the fridge if using within a few days. Once you're ready to use the stored dough, just continue with the next step.

4. Grease a 10-inch cast-iron skillet with about 1 tbsp vegetable oil. Place the dough in the middle of the pan and press it down lightly. Cover the pan with plastic wrap and let stand for two hours.

5. After about an hour, turn your oven to the highest temperature it will go (generally 525 - 550 degrees F).

6. An hour later, remove the plastic wrap from the pan and lightly press the pizza dough until it covers the pan, the whole pan, and nothing but the pan. If the dough seems to have air trapped underneath, gently lift it (one quarter at a time) to ensure even baking.

7. Top the dough with sauce, then cheese (grated), and then your toppings. The pizza pictured above was topped with mushrooms, red onion, red peppers, and sausage (which I had pre-cooked in a frying pan) on one side.

8. Bake in the oven for about 15 minutes or until the crust is lightly browned.

9. Loosen the pizza with a spatula and check underneath - if it's not golden brown, you can finish on the stove top over high heat for 1-2 minutes.

10. Transfer the pizza from the pan to a pizza peel or cutting board, cut into slices, and try to not eat so fast that you pass out from pure delight.

11 January 2014

Swedish Cinnamon Rolls: Kanelbullar


I posted a recipe for cinnamon rolls a while back, and while they are definitely well worth baking, I prefer the Swedish kind I grew up with. The Swedish version is not as sweet (as they're not glazed) and contains cardamom, which you'll find pretty frequently in the Swedish kitchen (for example, it's featured in the mulled wine we drink around Christmas: glögg).

The only ingredient that might be difficult for non-Europeans to find is pearl sugar, apparently also called nib sugar. While, yes, it's "only sugar," it's a pretty integral part of the recipe. Some IKEA stores might carry it (Swedish name: pärlsocker). I couldn't find any at my local IKEA store, but I did find some in a kitchen supply store. I recommend kitchen supply stores to anyone looking for hard-to-find ingredients or any kitchen hardware, bar perhaps appliances. If you happen to be in Southern California or Arkansas, Surfas is well-stocked. If you really can't find pearl sugar, you absolutely can glaze these cinnamon rolls, or you can top them with chopped almonds or even some sprinkles. I'd add the sprinkles after they're cooked, though. Just in case.

Swedish Cinnamon Rolls

2 cups whole milk
1/2 oz (14 g or ~5 tsp) active dry yeast
1 tbsp ground cardamom
5 oz (1 1/4 stick) unsalted butter at room temperature
1 egg
1/3 cup + 1 tbsp sugar
1 1/2 tsp baking powder
1/2 tsp kosher salt
5 cups AP flour

Filling
5 oz (1 1/4 stick) unsalted butter at room temperature
4 tbsp cinnamon
1/3 cup + 1 tbsp sugar

Topping
1 egg
pearl sugar (see note above)

paper baking cups

1. Cut the butter into small cubes and set aside.

2. Mix the milk and cardamom together. Heat in a pot over medium heat or in a microwave at 50% power until 118 degrees F (48 degrees C).

3. While heating the milk, thoroughly mix the flour, yeast, sugar, baking powder, and salt in a mixing bowl.

4. Pour the milk into the bowl of a stand mixer (if using) and add the egg.

5. Add the flour mixture to the milk and mix with the dough hook for 8-10 minutes. If not using a stand mixer, buy a stand mixer. Just kidding (or am I?). If not using a stand mixer, mix with a wooden spoon until everything comes together, then knead with your hands for 10-15 minutes. Add the butter, one cube at a time, until incorporated.

Note: if the dough is very wet and sticky, add a little more flour. The more flour you add, the drier the end product will be, so be careful! The dough will lose a little stickiness after rising.

6. Allow the dough to rise under a kitchen towel for 40 minutes.

7. Lightly dust a workbench with flour and pour out the dough on top. Turn the oven to 480 degrees F (250 degrees C).

8. Knead the dough for a few minutes, adding more flour if very sticky. Split the dough into two parts.

9. With a rolling pin, roll each part into a rectangle, about 1.5 times longer than it is broad. The end result should be about 1/3 of an inch thick.

10. Mix the butter, cinnamon, and sugar for the filling together until it forms a smooth paste.

11. Spread half of the filling across one of the dough pieces, ensuring you cover all of it.

12. Roll the dough into a tight "log" from one of the long sides (filling side on the inside, obviously).

13. Cut the log into roughly 1/2-inch thick pieces (you may need to discard the very ends if there's not enough filling there).

14. Place the paper baking cups onto a cookie sheet. Place a cinnamon roll into each cup, cut side up.

Repeat steps 11 - 14 with the other piece of dough.

15. Sprinkle pearl sugar (if using) on top of each roll and bake in the middle of the oven for about 10 minutes or until golden brown. Keep an eye on them - they burn fairly easily!

16. Let cool for a few minutes before consuming.

These go best with coffee or a glass of ice-cold milk. When I made the ones pictures above, it was too late for coffee and milk didn't feel quite right. My wife, Jacquie, realized that a White Russian was the perfect substitute for both - it's a cocktail, it has milk, it has coffee. What's not to like?

06 January 2014

Seafood Stew with Fennel and Saffron


One of the coolest things about cooking is that you can take ingredients that you think might work together, add them up, and create something new and exciting. The more you experiment, the more you learn about different flavors and textures that work together really well.

One such combination that is pretty classic is that of seafood and saffron - the French bouillabaisse, for example, uses a broth flavored with tomatoes and saffron combined with what is classically considered "unsellable" fish (rockfish, angler fish) and various shellfish such as mussels, clams, and whatever else the fishermen in Marseilles could find.

A while back, I decided to try to make my own seafood stew. It uses slightly more common and easier-to-find fish, it's not as soupy as a classic bouillabaisse, and it has potatoes in it, but the flavors are most certainly there. It doesn't hurt that this is a very easy recipe to put together and can be done in half an hour or less! The seafood stock below is great, but you can easily use store bought stock as well. I like the Kitchen Basics brand.

I like to serve this with either fresh bread (with maybe some salted butter or even a slice of good cheese) or toasted bread that you rub a garlic clove over just after taking it out of the oven.

Seafood Stew with Fennel and Saffron

1 yellow onion
2 cloves garlic
1 bulb fennel
3/4 lb small potatoes (new potatoes work well, as do fingerling potatoes)
1 qt seafood stock (recipe below)
1/2 lb firm white fish such as cod or tilapia
1/2 lb salmon filet
1/2 lb shrimps
1/2 cup dry white wine
2 tbsp dry vermouth
1 tbsp Pastis (optional - made with aniseed which has a very similar taste to fennel and will intensify that flavor in the dish)
1 can (14.5 oz) crushed tomatoes
0.2 g (0.007 oz) saffron
olive oil
salt
black pepper

Start by peeling and dicing the onion. Cut the stems off the fennel bulb and slice into very thin strips. Heat two tablespoons of olive oil in a large pot over medium heat. Add the onion, fennel, and half a teaspoon of salt and cook until the onion is translucent. While the onion and fennel are cooking, mince the garlic. Add to the pot together with the saffron and let cook another minute. Slice the potatoes into 1/2-inch thick slices and add to the pot. Cook, stirring frequently, for about two minutes. Add the wine, vermouth, and Pastis (if using) and let cook for about three minutes.

Add the seafood stock and crushed tomatoes and let cook until the potatoes are soft, about 15 minutes. In the meantime, slice the fish into small strips. Peel and devein the shrimps. Once the potatoes are soft, take the pot off the heat and add the seafood. Cover with a lid and let stand for about three minutes or until the fish is cooked through and the shrimps are pink. Add salt and black pepper to taste and serve immediately.

Seafood Stock

4 cups shrimp shells and heads (or crab shells, or lobster shells, or any combination)
1/2 cup white wine
1 yellow onion
1 large carrot
1 stalk celery
2 tbsp tomato paste
2 sprigs of thyme (fresh)
2 bay leaves
10 whole black peppercorns
1 tsp kosher salt
2 quarts filtered water

Turn your oven to 400 degrees F. Roughly chop the onion, carrot, and celery. Place the vegetables and seafood shells in a large roasting pan and cook for 10 minutes. Place the roasted ingredients together with the wine, tomato paste, thyme, bay leaves, peppercorns, and salt in a large stock pot and cover with the water (you may need to use more or less water than listed above, just use enough to cover all the other ingredients). Bring to a simmer over medium heat, but ensure you never let the stock boil. Do not stir the stock at any point. If you do, there's a risk it will turn cloudy, and you want it to be as clear as possible.

Skim off any fat or foam that rises to the surface with a slotted spoon. Let simmer for about 90 minutes, then strain through a sieve, preferably covered with cheese cloth to catch even the smallest pieces. Let cool and either use right away for the stew or store. You can keep the stock in the fridge for up to three days or in the freezer for up to three months.

05 January 2014

I'm back!

Well, about to be back. I've decided to start writing again. Stay tuned in the next few days for my triumphant return. I'll try to update weekly going forward.

I'm excited. Are you excited? You should be excited.