11 December 2009

Glögg (Swedish Mulled Wine)

Glögg! What Swedish Christmas would be complete without it? No Swedish Christmas, I say! A lot of countries have their version of mulled wine, specifically ones that get really cold in winter (like the Scandinavian countries and central European ones). In Sweden, you can generally buy glögg with a very low alcohol percentage or that is based on grape juice in any grocery store a few months prior to Christmas. The real stuff, made with red wine and vodka, can be bought ready made at Systembolaget, and the makers generally come up with a variety of flavors for every season. Making your own is easier and cheaper either way, and the added benefit is that you can get the ingredients anywhere and don't have to settle for the alcohol-free version they sell at IKEA.

Glögg is served in a small cup (glass or ceramic) with raisins and slivered almonds. You place the fruit and nuts in the cup and eat them with a teaspoon as you drink the wine. Obviously, you should serve the glögg with pepparkakor, Swedish gingerbread cookies.

Oh, and about the picture above - I made a bunch to give away for Christmas and didn't have any non-bottled glögg to take a picture of. It's supposed to look like red wine. If it looks like anything else, you're doing it wrong.

Glögg

1 bottle dry red wine
1 cup vodka
1/2 cup sugar
2 whole cinnamon sticks
1/2 tbsp cardamom (whole)
1/2 tbsp cloves (whole)
The peel of 1 bitter orange (if you can't find these, a normal orange will suffice)
1 tsp vanilla extract (optional)

Start by grinding the whole spices coarsley. Pour the vodka into a bowl, add the spices, the cinnamon sticks (break them up first) and the peel of the bitter orange. Cover with a lid, plastic wrap, or tin foil and let stand for 24 hours.

Once the 24 hours are up, remove the orange peel and cinnamon sticks, then filter the vodka into a large pot through a coffee filter or similar (a cheese cloth would probably work well). Add the wine and sugar. Turn to very low heat. The slower you heat this, the more alcohol it will retain, and the end result will be much better. Don't boil it. Once brought to a simmer, stir until all the sugar is melted.

Serve in small cups with raisins and slivered almonds.

You can easily double, triple or quadruple this batch and store in dark bottles for about a month. Just make sure you seal them properly and heat gently when it's time to have a cup.

If you do wish to make a virgin version of this, use alcohol-free wine and steep the spices in regular filtered water overnight instead of vodka (use 1/2 cup of water for each bottle of wine).

I've also found that heating the glögg in a slow cooker/crock pot is ideal if you have a lot of people over. Turn to "high" until heated, then keep at "low" and serve straight out of the crock pot - just make sure you turn it off once it's empty! A cracked crock pot is a sad crock pot.

09 December 2009

Peppermint Bark

All right, time for a break from the Swedish candy. Let's make some American candy! Peppermint bark is pretty awesome, and making it yourself is easy and way cheaper than buying the pre-made stuff sold by various companies.

Peppermint Bark

1 lb white chocolate chips
7 oz candy canes

That's it, ingredients-wise. You can add peppermint extract if you want a stronger peppermint flavor, but there's really no need to.

First, crush the candy canes. You can put them all in a strong plastic bag, fold the bag so no cane will escape alive, then pound the bag with a hammer or meat tenderizer (flat side, there's no need to tear huge holes in the bag) or you can use a food processor like I did. I crushed the canes a little too finely, but it turned out (very) well anyway.

Next, line a cookie sheet with parchment paper. You're most likely not going to go all the way to the edge, so there's no real reason to cover all the sides of the sheet.

Next, start up a double boiler: pour an inch of cold water into a medium pot. Place a metal bowl that fits over the pot (make sure the water does not touch the bowl). Bring the water to barely a simmer - I put it on 3 on a scale of 1-10 and it got a little too hot after a while, so I had to lower it to a 2. Place the chocolate chips in the bowl and stir with a spoon or spatula until completely melted.

Take the bowl off the heat, then add the crushed candy canes. Stir to combine, then pour the mixture onto the center of the parchment paper, using a plastic spatula. Spread until about 1/3 inch thick. Leave to cool for about 15 minutes, then put in the fridge until completely firm (about 1 hour). Break up using your best tool (that would be your hands), then store in a glass, metal or plastic container for up to two months (if this lasts two months, your self control should be in the Guinness Book of World Records).

07 December 2009

Gräddkola (Swedish Toffee)


I'm on a Swedish Christmas foods kick recently, and one of the things I distinctly remember eating way too much of as a kid is what we call gräddkola, or cream toffee. This recipe was handed down from generation to...eh, not really, but it's from my mom's recipe book and it came out really well.

I can think of healthier things to eat, but it's pretty spectacular as far as candy goes.

Gräddkola

1 1/4 cup heavy whipping cream
3/4 cup half-and-half
2 1/3 cups sugar
1 cup golden syrup (or a mix of 1/3 cup molasses and 2/3 cup light corn syrup)
3 tbsp unsalted butter
1 1/2 tbsp cocoa
1/2 tbsp vanilla extract
chopped almonds (optional)

Mix all ingredients apart from the vanilla extract in a large, heavy-bottomed pot. Turn to low heat (I used 2 on a scale of 1-10) and stir occasionally, about every 10-15 minutes. Stir with either a heavy wooden spoon or a plastic spoon - note that the residue on the spoon will be very sticky after a couple of hours. That's right, you'll be letting this simmer over low temperature for about 4 hours. Add the vanilla after 3 hours and 45 minutes.

Once 4 hours have passed, pour cold water into a drinking glass. Place about a teaspoon of the toffee in the water, then pull the toffee out and try to shape it into a ball. If you are unable to, the toffee needs to cook longer. The softer the ball is, the softer the toffee will be (which means it will be harder to handle). The longer you cook, the harder the candy, so if you do go past the 4 hours, make sure you check it every 15 minutes or so. Mine was done after almost exactly 4 hours and came out a little on the soft side.

Butter a 9x13 inch glass baking pan. Once the toffee is ready, pour it into the pan and leave until completely cooled. Next cut the toffee into bite-sized pieces, using a knife or scissors (I used scissors and it worked perfectly). Wrap the toffee in wax paper. Try not to eat all of them before you've let at least someone else try one!

The toffee will last for about a month if kept in a cool and dark place (but not in the fridge).

06 December 2009

Hot Chocolate with a Kick

It's cold out there, and what better remedy is there than hot chocolate? I decided to make some the other night, with a slight kick added: whiskey cream liqueur (or Bailey's, as most people would call it, no matter the brand).

Hot Chocolate with a Kick

1 serving of hot chocolate (I use Swiss Miss milk chocolate)
3 tbsp heavy whipping cream
2 oz Bailey's cream liqueur (or similar)
cocoa for sprinkling

Mix the hot chocolate according to the instructions on the package. Whip the cream until soft peaks form. Pour the hot chocolate into a cup, add the Bailey's and stir. Top with the whipped cream and sprinkle cocoa on top.

Super simple, extremely healthy (not!), and so very, very good.

01 December 2009

Gingerbread Cookies


It's finally getting close to Christmas, and I decided to celebrate this fact by baking gingerbread cookies - Swedish style. The ones you can find in the U.S. seem to be a bit darker and heavier than what I'm used to, the main reason being that a lot of color comes from molasses. This traditional recipe uses golden syrup instead, but if you are unable to find this, mix 1/3 molasses and 2/3 light corn syrup for the same effect (I did find some, in the third store I checked).

I remember being (much) younger, helping my mom bake these cookies. As a child, you end up eating about as much of it as you finally end up baking, but I managed to exercise some restraint and had just a small taste of the dough while I was making it to make sure the spices came out the way they're supposed to. The dough won't take long to make, but plan on spending at least a couple of hours shaping the cookies with various cookie cutters if you end up making the full batch at once (I decided to make half the batch today and the rest in a few days; it will last in the fridge for about a week). The cookies themselves will last over a month if kept in a cookie jar or tin and up to six months if you freeze them. Depending on thickness, this recipe will make over 200 cookies.

Those are my fiancée's hands in the picture, not mine. Just saying.

Swedish Gingerbread Cookies

10.5 oz/300g/2.65 sticks unsalted butter
2 cups plus 1 tablespoon sugar
1/2 cup golden syrup
1 tbsp ground ginger
1 tbsp ground cloves
2 tbsp cinnamon
2 tsp ground cardamom
1 tbsp baking powder
3/4 cups water
6 1/3 cups all purpose flour

In a stand mixer fitted with the paddle attachment (or in a large bowl, using an electric mixer), combine the butter (at room temperature), sugar and golden syrup. Mix well, until completely blended into a smooth batter.

Add spices and baking powder and mix well. Add the water and mix well. Next, add the flour, one cup at the time, and make sure the flour is completely incorporated before you add the next cup. However, if you're not using a stand mixer, add all the flour at once and turn onto a baking board and knead by hand.

Once the dough comes together, divide into two halves and wrap each with tin foil. Refrigerate at least overnight or up to a week.

Once it's time to bake, turn the oven to 400 degrees F. Arrange parchment paper (not wax paper!) on a baking sheet or lightly coat the sheet with vegetable oil (I strongly prefer the parchment paper). If you have multiple baking sheets, I suggest using all of them, one at a time. Next, cut off a chunk of dough - I cut mine into about a tenth of the total amount of the dough in one of the two foil packages, but it's down to how big of a work area you have to work with. I wouldn't recommend working with huge pieces of dough, though. Next, sprinkle some flour on the work area/baking board, add the dough and sprinkle some flour on top of it. Using a rolling pin, roll the dough thinly, to about 1/4 inch thickness (about half a centimeter).

Now comes the fun part: punch out shapes with cookie cutters. I used Christmas trees, Father Christmas heads, stars, hearts, etc. Once you're unable to fit any more cookies, remove whatever dough is left outside the shaped cookies. Next, using a thin metal spatula, transfer the cookies to the cookie sheet. These cookies will barely grow, so you can place them relatively close to each other.

Bake for 6-7 minutes or until lightly browned around the edges. Transfer to a cooling rack and bake the next batch. I prepared the second batch while the first was in the oven and basically didn't have an empty oven for an hour or so. Once the cookies are cooled, transfer to a storing vessel and store at room temperature.

If you wish, you can add colored sugar crystals to the cookies before you put them in the oven. You can also add a glaze and draw patterns on the cookies. Simply mix 1 tablespoon hot water, 1 egg white and 2 - 2.5 cups sifted confectioner's sugar. Place the glaze in a plastic bag, cut a very small hole in a corner and you're good to go. Just make sure you let the glaze dry before storing the cookies.

Serve the cookies with a hot beverage. While some may enjoy them with coffee, tea or hot chocolate, nothing beats Glögg, traditional Swedish mulled wine. I will be posting my recipe for Glögg in the coming days. Stay tuned.

09 November 2009

Shrimp Gumbo


I've been meaning to try to make some gumbo for a while now, and when a buddy requested it on Facebook, I decided it was time. For those not in the know, gumbo is traditional Louisiana fare, based on a roux, stock, some form of meat and/or seafood and thickened using either okra or filé powder. I was unable to find okra, so I went with the filé powder for the recipe below.

If you are unable to find okra and/or filé powder, it is possible to just use the roux as the thickener. Traditionally, you'll slave over the stove for an hour, stirring the roux, but the recipe below uses Alton Brown's genius technique of letting the roux bake in the oven instead. Saves a lot of work!

Shrimp Gumbo

4 oz all purpose flour (1/2 cup by volume)
4 oz vegetable oil (1/2 cup by volume)
1.5 lb shrimp, unpeeled, head-on
0.5 lb andouille sausage
1 green bell pepper
3 stalks celery
1 large yellow onion
3 cloves garlic
2 tomatoes
2 bay leaves
1 tbsp filé powder
salt
pepper
cayenne pepper
rice

Set the oven to 350 degrees F. In a large dutch oven (I actually used a stainless steel stock pot and it worked fine, nothing burned), stir together the oil and flour. Place in the oven for 1.5 hours, whisking every 30 minutes. Next, peel and devein the shrimp, and place the shrimp in a bowl in the fridge. Place the heads and shells in a large pot along with 2 quarts (roughly 2 liters) of water. Bring to a boil over high heat, then lower to a simmer and reduce to half, which will take about an hour. I was unable to find head-on shrimp, so instead I replaced two cups of water with two cups of store-bought seafood stock. If you can't find either head-on shrimp or seafood stock, two cups of chicken stock together with the shells will do in a bind. Once reduced, strain with a fine mesh strainer and discard the shells and heads.

At this point, slice the andouille sausage into 1/2 inch slices and brown in a frying pan over medium heat. Move to a plate lined with paper towels. Note: if you are unable to find andouille sausage, the closest would be hot Italian sausage. If you can't find that, any form of pork sausage will do, and if it's not spicy at all, you can add a clove or two of garlic and a teaspoon of cayenne pepper later. Dice the onion, pepper and celery. Mince the garlic. Remove the skin from the tomatoes (cut a small, shallow cross at the bottom, boil in water for 15 seconds, move to an ice bath - skin should come right off), remove the seeds and cut up the flesh. Once the roux is ready, remove from the oven (you can turn the oven off at this point) and place over medium high heat. Add the pepper, onion, celery and garlic and cook, stirring frequently, until onion is fragrant and translucent, about 5 minutes. Add the tomato, bay leaves, about a teaspoon of salt and pepper, and about half a teaspoon of cayenne pepper (to taste - you like heat, add more cayenne pepper, but remember that the andouille sausage is spicy as well). Add the stock, about a third at the time, while stirring frequently. Stir, cover and let cook for about 30 minutes.

When the 30 minutes are almost up, start making the rice according to the instructions on the package - I find that 1 cup of rice to 2 cups of water works well. Turn off the heat on the gumbo, add the shrimp and sausage and stir. Next, add the filé powder and stir. Cover, and leave for ten minutes. Remove the bay leaves, then serve over the rice and enjoy with a glass of red wine, white wine, beer or whatever else tickles your fancy.

03 November 2009

Baked Chicken and Macaroni

It's getting "cold" out there (it's mid-70's in Austin these days, but I hear it's snowing in Sweden so it's getting cold out there somewhere...) - time to make some hearty meals. We had slow cooker chili last night, and tonight I decided to make a chicken and macaroni bake. Simple, filling, and really good. We washed it down with a bottle of 2004 Jacob's Creek Reserve Merlot that my good friend Craig gave me for my 30th birthday. I still can't believe I'm 30. Oh well.

Baked Chicken and Macaroni

1.5 cups elbow macaroni
1 large or 2 medium chicken breast fillets
1/2 medium yellow onion, chopped
2 cloves garlic, chopped
1.5 cups shredded mozzarella cheese
1/2 cup "Italian" flat-leaf parsley
1 can crushed tomatoes
1/2 cup grated parmesan cheese
1/2 cup white bread crumbs
1 tbsp butter
salt
pepper
olive oil

Turn the oven to 400 degrees F. Boil the macaroni until al dente (generally, if the package says 8-10 minutes, 8 means al dente, 10 means way overcooked). Cut the chicken breast(s) into half-inch pieces. Put a couple of tablespoons of olive oil to a saute pan and add the chicken. Cook for a few minutes, then add the onion and garlic. Cook until fragrant, about 5 minutes. Drain the macaroni and place in a large bowl. Add the chicken, onions and garlic. Coarsely chop the parsely and add, together with the tomatoes. Sprinkle about a half teaspoon of salt and half a teaspoon of pepper into the mixture, then stir thoroughly.

Place the mixture in a baking dish (I used my trusty 9x9x2 inch Le Creuset baking dish). Mix the parmesan and bread crumbs, then sprinkle over the macaroni mixture. Dot small pieces of the butter on the dish, then bake in the oven for about 30 minutes.

I served it with oven roasted vegetables (tossed with some olive oil, kosher salt and black pepper, in the oven at 400 degrees F for about 15 minutes) and it was great.

12 October 2009

Apple & Raspberry Crumble

There's a saying where I come from: a good crumble is better than two...in...th...uh...actually, I don't know of any sayings that involve crumbles, but they're really awesome so I decided to make one and post the recipe here. You can obviously try various fruit combinations, but this one is pretty fantastic.

Apple & Raspberry Crumble

1 stick + 1 tbsp unsalted, chilled butter (9 tbsp)
1.25 cups all purpose flour
0.75 cups granulated sugar, divided
2 medium apples (I like Gala, but pretty much any apple will be fine)
12 oz raspberries (about 1.5 cups)
ground cinnamon
salt

Turn your oven to 425 degrees F. Next, peel and core the apples. Cut them into small chunks, about half an inch. Wash the raspberries. Place the fruit in a 9 inch tart pan (preferably made of glass, but metal will work as well). Sprinkle about 1/4 cup sugar over the fruit.

In a bowl, stir together the flour, sugar, a small pinch of salt and about half a teaspoon of cinnamon. Next, cut the butter into the flour in chunks. Now, it's time to get dirty: mix the flour mixture with the butter with your fingertips. You're looking to divide the butter enough that there are no large chunks left, but you're not looking to form a uniform dough, like you would when making a pie or quiche.

Sprinkle the mixture over the fruit, making sure to cover as evenly as possible. Bake in the middle of the oven for about 20-25 minutes, or until the fruit is bubbling and the crust is golden. Serve warm or at room temperature with vanilla ice cream.

This will keep, covered, for about 4 days if left in room temperature and about a week in the fridge. If you keep it in the fridge, I suggest reheating it in the microwave for half a minute on high before eating.

Mountain of Cookies

I just had to share my mountain of cookies. Now I want one, and I'm all out :(

15 September 2009

Swedish Meatballs


Being Swedish, I can't believe it took me over 40 posts to finally post a recipe for Swedish meatballs! These are a modified recipe of my mom's meatballs (who else?) and are perfect for children as well as adults. In Sweden, meatballs are generally served as a kid's dish and they're usually a huge hit on the smorgasbord for Christmas. These have a slightly more "adult" taste.

When I was working in the kitchen of a bar outside of Paris (The Bitter End in St Germain-en-Laye), I made them and they became an instant hit. After that first try, I basically had to make them as the daily special every Wednesday! The main reason I'm posting right now is because someone I used to work with at that bar was checking out this blog for the first time and was wondering where the meatballs were at!


Meatballs can be made as almost "thin" food (by using water and low fat meats) or, even more delicious, as a decadent meal that you probably shouldn't be eating on a daily basis (by using cream for both the meatballs themselves and the pan sauce.) The below recipe is the more decadent kind, but I have commented what to substitute if you want a leaner dish. I served this with my creamy mashed potatoes, but the original dish is generally served with boiled potatoes or some form of pasta.

Swedish Meatballs with Mashed Potatoes and Cream Sauce

Meatballs:

1 lb ground beef (I use 7% fat which seems to work well)

5 oz ground pork
1/2 cup breadcrumbs
2/3 cup heavy cream
1 egg
1 large yellow onion
3 tbsp butter
white pepper
kosher salt

"Stock" and Sauce:

beef or veal stock (preferably homemade, or a reduced broth - dried will work)
1 carrot
1/2 yellow onion
2 bay leaves
4 garlic cloves
~10 oz heavy cream
corn starch
soy sauce

Mashed Potatoes:

6 large potatoes
1/3 cup sour cream
white pepper
kosher salt

Lingonberry jam for serving (available at IKEA all over the world)

Begin by bringing 1/2 gallon of water to a rolling boil. Add the carrot, half onion (cut up in chunks), bay leaves, garlic cloves (smashed and peeled) and the stock. If you're using homemade, well-reduced stock, about 1/4 - 1/3 cup will be enough. If using dried bullion, about 1.5 - 2 tablespoons should be enough. Let this boil (without a lid) while making the meatballs.

Peel the potatoes and cut them up into chunks (for faster cooking). Pour water into a large pot, add the potatoes and a pinch of salt and bring to a boil over high heat. I generally keep them covered while boiling; just keep an eye on the pot if you do the same.

For the meatballs, start by mixing the cream (this can be replaced by water for a leaner meal) and the breadcrumbs in a large bowl. Let stand for ten minutes. In the meantime, very finely cut the onion. I used a very fine grater for this - it basically turned the onion into a mush, which is fine. You don't want large chunks of onion in the meatballs. Once the breadcrumbs and cream have stood for ten minutes, add the ground beef, ground pork, 1 teaspoon white pepper, 1 teaspoon kosher salt, the onion and the egg. I wear latex gloves for the next step - if you do not have any available, make sure you have some cold water in a bowl to dip your fingers in.

Mix the ingredients well with your hands. Once there are no chunks of the breadcrumb mix left, you're ready to start rolling. Make meatballs around an inch to an inch and a half in diameter and place them on a plate.

Turn the oven to 250 degrees F. Place about 5-6 meatballs in the pot of boiling "stock" and leave for about 3 minutes. Most of the meatballs should start floating (but if they do not, don't let them stay in the pot for more than 3 minutes). Remove with a slotted spoon and place on a plate covered with a paper towel. Once you've cooked all the meatballs, let the water continue cooking. In a large pan (I prefer cast iron, but nonstick or stainless steal will work fine), melt the butter over medium heat. Add about ten meatballs and cook until they have some surface color. Be careful not to burn them. Once a batch is done, place in an oven-safe dish and place the dish in the oven. Repeat until all the meatballs are done.

Once the potatoes are cooked, drain and put back into the pot you boiled them in (or a bowl). Mash them with a fork or potato masher. Add about a teaspoon of white pepper and the sour cream, then stir to combine. Keep warm by placing a lid on top (mashed potatoes will also reheat well in the microwave if need be).

The final step is the sauce. If there's very little to no fat left in the pan you cooked the meatballs in, add a tablespoon or two of butter. Add about a tablespoon of corn starch and stir with a whisk or wooden spoon, removing brown bits from the pan. Next, bring out a mesh strainer and pour the "stock" into the pan. You'll need about a cup of the stock. Whisk together and add the cream (if you wish for a leaner meal, you can replace the cream with more stock, water or red wine) and about two tablespoons of soy sauce - make sure you taste it, soy sauce is salty! Whisk and let cook for a minute or two. Salt and pepper to taste.

Remove the meatballs from the oven, place on a plate and smother with the sauce. If you're using boiled potatoes instead of mashed, make sure they get a dose of the sauce as well! Serve with the lingonberry jam and eat immediately.

Hmm, I wonder if I should go have seconds now...

25 August 2009

KitchenAid Pasta Attachment (plus a recipe!)

I finally got around to buying the pasta maker attachment for my KitchenAid stand mixer relatively recently - it's been a while since I actually bought it, but I've been too lazy to write about it.

The attachment is great - and the fact that I make the actual pasta dough in the mixer and then flatten it and make tagliatelle with the attachment is awesome!

In honor of my wonderful new piece of equipment, here's a recipe I came up with at some point in the recent past.


Tagliatelle with a Creamy Smoked Salmon & Mushroom Sauce

1.5 cup heavy cream
0.5 cup dry white wine
6 oz mushrooms
5 oz smoked salmon
2 tbsp butter
salt & pepper
Tagliatelle for two, preferably homemade

Start by boiling water for the pasta in a large pot with a tablespoon of salt and a little bit of olive oil (especially if using fresh pasta.) Slice the mushrooms thinly. Melt the butter over medium high heat in a saute pan. In the meantime, bring the cream and wine to a simmer in a pot. Slice the smoked salmon thinly. When the mushrooms have sweated out most of their moisture content, add the salmon and cook for another couple of minutes. Boil the pasta for 2-3 minutes, if using fresh pasta. If using dried pasta, follow the instruction on the package (and start cooking it earlier.) Add the mushrooms and salmon to the cream mixture. Salt and pepper to taste. Serve immediately with crusty bread and maybe a side salad for the rabbit food lovers.

23 July 2009

Shrimp and Asparagus Risotto


I'm back! Woo!

I do apologize for the delay in making this post. I will do my best to get back to the twice weekly updates now. Hopefully, at least!

I love a good risotto, and one of my favorite things with making one is how it tastes and looks like it was hard to make and cost a lot. This does not have to be true at all (unless you like to throw copious amounts of extremely difficult-to-cook ingredients in there, and top it all off with real diamonds, of course.) This specific risotto is pretty awesome, and very quick to prepare. Enjoy!

Note: apparently, there's one of these on Olive Garden's menu. This, however, is good as opposed to what I can only assume is a travesty of food that they would serve you there.

Shrimp and Asparagus Risotto (Risotto di gamberetti e asparagi)

Serves 2

10 medium shrimp, peeled and deveined
10-15 asparagus stems
1/2 medium sweet or yellow onion
1 cup arborio rice (risotto rice)
1/2 cup dry white wine
3-4 cups chicken stock, possibly more
1/2 cup parmesan cheese
2 tbsp freshly squeezed lemon juice
4 tbsp butter
2 tbsp olive oil
salt & pepper

Start by bringing a large pot of water to a rolling boil, and add about two teaspoons of salt. While you're waiting for the water to boil, clean the asparagus and cut off the very bottom ends. If there are some very large stems, cut them in two pieces. Once the water is boiling, add the asparagus and boil for four minutes. With a slotted spoon, transfer to an ice bath to avoid further cooking.

Next, prepare the shrimp - peel and get rid of the veins. Add the shrimp to the boiling water and cook for about 3 minutes, or until pink. Set aside. Bring the chicken stock to a simmer, but don't let it boil so it starts reducing too much. Covering the pot should keep the liquid from evaporating.

Next, chop the onion into small pieces and place in a pan, together with the oil, over medium heat. Cook until translucent, about 3 minutes. Next, add the rice and cook, stirring constantly, for about one minute. Do not let the rice get any color. Add the wine and lemon juice, and continue to stir constantly, until the wine has been absorbed. At this point, start adding the simmering chicken stock, 1/2 cup at the time, while you continue to stir. Once it's evaporated, add the next half cup and continue this process until the rice is al dente - cooked through, but still slightly hard.

Once the rice is finished, add the butter and Parmesan cheese, then stir. Salt and pepper to taste, then add the asparagus and shrimp. Stir until everything has heated up, then serve immediately with fresh bread and the white wine you used in the risotto, if you have any left!

01 July 2009

I Am Lazy...

Yes, I am aware that I haven't updated for a while now. It sucks. I'm sorry. I've been busy at work and haven't had the energy to update in the evenings. It'll get better soon - just got some new toys for the kitchen and will post about them in the coming days. That's a promise.

In the meantime, here's Alton Brown's segment on the Food Network All-Star Grillfest.

08 June 2009

Pasta salad


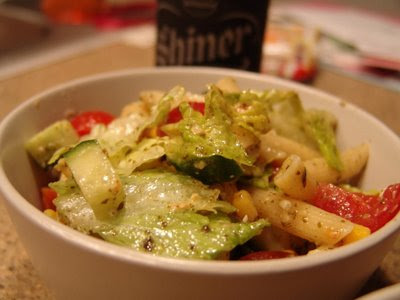
Yes, yes, I know that was more than a couple of weeks. I didn't forget about the blog, I was just crazy busy. Now I'm not...actually, that's not true, but at least I've decided to take the time to start updating the blog again! It's right around 100 degrees F out there (that's ~38 degrees C), so I thought a nice, cool salad would be a good idea. I've always had a special place in my heart (stomach) for pasta salads, and here's a pretty simple one that always leaves me hungry for more. For more substance, add some cold, cooked chicken and crumbled bacon - but this sucker is actually vegetarian in the original recipe, that follows (crazy, right?)

Pasta Salad

1 package (16 oz) penne pasta
15 cocktail tomatoes
1 cucumber
1 can corn (or 2 fresh corn cobs, cooked with the corn removed from the cob)
1/2 head romaine lettuce
8 oz feta cheese, crumbled
pesto sauce

Boil the pasta until al dente. Drain and let cool. Wash and shred the romaine lettuce. Wash and quarter the cocktail tomatoes. Wash, then dice the cucumber. Drain the corn (if using a can), or wash the cobs, remove the kernels and cook them (most recipes call for a non-stick pan with a little bit of oil over medium heat until the corn is cooked). Put the cooked and now cooled pasta in a large bowl. Add about five tablespoons of pesto sauce (recipe follows below, or you can buy a jar at the grocery store) and stir until all the pasta is covered. Add the rest of the ingredients and mix until combined. If you wish, add cooked, sliced chicken or turkey and crispy, crumbled bacon to the mix at this point.

Serve with freshly baked bread and a cold beer on a sunny patio (unless it's friggin' 100 degrees out, you want the shade then) for optimum results.

Pesto Sauce

2 cups fresh basil leaves (packed)
1/4 cup grated fresh Parmigianio Reggiano
1/2 cup extra virgin olive oil (use the good stuff if you have it)
3 tbsp pine nuts
3 garlic cloves, finely minced

You'll need a food processor for this. Start by placing about a third of the basil leaves in the processor and blend until finely chopped. Add a third of the garlic and a third of the nuts and blend again. Add a third of the cheese and a third of the oil, and blend again. Once it turns into a paste (you may have to scrape the sides of the bowl). Empty the bowl, then repeat the process until you've used all the ingredients. Combine the batches. This will last about a week in the fridge, a few months in the freezer. If you're not making pasta salad, it works really well if you just add it to freshly boiled pasta. I used to heat it with a little bit of creme fraiche and serve over spaghetti, but it's crazy expensive and hard to get creme fraiche in the US and I wouldn't want to try it with sour cream. Heavy cream is probably a better bet.

01 May 2009

Sweden Trip!

I'm going to my native Sweden in a few days, and will spend two weeks trying to do as much as possible. Hopefully I'll bring back some Swedish goodies that will end up on the blog at some point :)

I won't be updating for about three weeks, starting now.

20 April 2009

Homemade Lemonade (and vodka)

Note: there's an updated version of this recipe available!

It's officially summer! No, that's completely incorrect, but Austin has had temperatures around 90 degrees F the last couple of weeks, so it feels roughly like a really warm Swedish summer to me. Oh, Texas.

What could be more summery than lemonade? Well, probably a thousand things, but lemonade is pretty summery, so I decided to make some from scratch and mix with cheap vodka last night. It came out tasting like I expected it to, which is to say "really good". Enjoy:

Homemade Lemonade

1 cup granulated sugar
1 cup cold tap water
3 large lemons

Let's start by creating a simple syrup. Pour a cup of water into a pot and place over high heat. When the water is boiling, add the cup of sugar and stir with a whisk or spoon until the sugar is completely dissolved, about 1 minute. Let cool completely.

Cut the lemons in half and extract the juice any way you see fit (pro tip: a juice press works pretty well for this). Mix the lemon juice with the simple syrup. This is now lemonade. If you feel it's too sweet or too sour, you can simply add more lemon or make a little more simple syrup and add to taste.

For the adults, and non-adults drinking illegally, mix 1 part vodka with 2 parts lemonade in a New York Yankees tumbler filled with ice, and enjoy on a patio, balcony, or any where else where you can find some early evening sunshine. All right, fine, if you don't have a New York Yankees glass, just use any ol' glass and make sure you order some Yankees glasses from the MLB store.

Pizza, oh Pizza


Made some pizza tonight, with Italian sausage and some wonderful Mozzarella. It was wonderful, and I'm so happy I have leftovers.

13 April 2009

Baked Peppers


This course is not something you generally see in fine restaurants. It appears most of the time, you'll see these contraptions in cafeterias, and (from what I understand - I've not had one in a cafeteria), they're apparently not very good at all. I remember them from way back when I was a kid and my parents would make them, but I can't remember trying to make one myself.

I decided to try making my own recently and they came out great...much better than the photo I took, which is slightly blurry - but you can't really tell from the thumbnail above, so don't click on it. I mean, uh...here's the recipe.

Baked Green Peppers

4 medium green peppers
2 shallots
1/2 yellow onion
2 cloves garlic
1 lb ground beef
4 strips of bacon
1/2 can diced tomatoes
1 cup uncooked white rice
1/2 cup mozzarella cheese
Salt
Pepper

Boil your rice according to the instructions on the package. I generally remove 20% - 30% of the water listed, as I like my rice al dente, but it's a personal choice. Boil water in a large pot with about a tablespoon of salt. Cut off the tops of the peppers and discard them (or eat them, I don't care). Remove the membranes and seeds, place in the boiling water and make sure they're submerged (place something on top of them if needed). Boil for about 3 minutes.

Set the oven to 350 degrees F. Chop your onions, garlic and shallots. Place in a frying pan with some cooking oil over medium heat for about 3 minutes or until the smell makes your mouth water. Add the ground beef, break apart and fry until cooked through, stirring regularly. In the meantime, fry the bacon crispy in a separate pan. Add the diced tomatoes to the ground beef. Once the bacon is done, cut it up in small pieces and add to the ground beef as well. Salt and pepper to taste. Stir in the cooked rice and take off the heat.

Next, make sure the peppers can stand on their own. If they cannot, slice off small pieces off the bottom until flat enough so they can stand up. Place in an oven safe form and add about 1/2 cup water around them. I also like to dash some olive oil over the peppers, but if you choose to do this, make sure you don't fill up a specific pepper too much. Now add the filling evenly to the peppers. If you have some left when they're all full - eat it. It's great on its own!

You now have a choice with the cheese! Either sprinkle the peppers right away and cover the dish with tin foil for the first part of the peppers' visit to the oven, or wait until they are halfway done and sprinkle then. Your choice! Either way, the peppers will need 35-40 minutes in the oven before they are ready, so add the cheese after about 20-25 minutes if you choose to follow the "halfway" option. If using tin foil, remove the tin foil at the very end to make sure the cheese gets browned.

Serve as is, or maybe with a green salad.

27 March 2009

Artisan Bread in 5 Minutes a Day


I had read about it for months, I saw the show on TV and one day on the way back home from work, I decided to stop by the Container Store for some baking equipment. That's right, the Container Store! I got me a big plastic box with a lid, took it home, poured some yeast, water and flour in there, stirred it around for a minute and just a day later, I had beautiful, fresh bread. The cost, in dollars? About $0.50. The cost, in time? About 5 minutes. The prize? Let me tell you, not much smells as good as freshly baked bread, and when it took basically no effort and no time, it's almost too good to be true.

The "Artisan Bread in Five Minutes a Day" book by Jeff Hertzberg (an MD...uh) and Zoe Francois is supposedly great. I didn't buy it yet, I might, but for now I'm happy with the basic recipe, which is simpler than simple. Trust me.

You'll definitely need a big bucket, plastic box or...well, something like that. A pizza peel helps. A pizza stone is pretty much essential. Once you have these things, let's get to work.

(Basic) Artisan Bread

1 1/2 tbsp dry yeast
1 1/2 tbsp kosher salt
6 1/2 cups all purpose flour
3 cups lukewarm tap water
cornmeal for dusting

In a large, resealable container, mix the yeast with the lukewarm water (around 100 degrees F is fine). Once mixed together, add the salt and mix again. Next, add the flour. Stir with a wooden spoon, until just combined. Do not knead. Do not over-stir. Do not add anything else. This will be an extremely wet dough, and it's supposed to be! Close the lid and leave to fend for itself (raise) for about 5 hours in normal room temperature.


Now place it in the fridge, and leave at least overnight. The longer you leave it, the more complex the dough will get and the better the bread will taste. Two weeks is max, though, don't leave it longer than that.

Once you're ready to bake, liberally dust a pizza peel with cornmeal. Remove the container from the fridge, and sprinkle the area of dough you intend to use with all purpose flour - you're looking to remove about a grapefruit-sized ball of dough from the container. Dust your hand with flour, grab the dough and pull. Use a serrated knife to cut the dough loose. Next, shape a ball in your hand - you're looking to gently stretch the dough. Do not knead it! Stretch, turn a 1/4, stretch again. Repeat until you have a smooth ball. If it's very wet, use more flour to dust, but the flour is not supposed to be incorporated into the actual dough, just cover the surface.


Let the dough rest on the pizza peel for about 1h30m. They say 45 minutes in the book, I believe, but I find waiting twice that length of time is better. When 40 minutes remain, place the pizza stone in the middle of the oven, something that can contain water and won't break in the bottom of the oven (a cast iron pan or a broiler pan works fine), then turn your oven to 450 degrees. Once the 1h30 is up, slash the top of the bread three times with a serrated knife, to prevent exploding bread in your oven. Transfer to the pizza stone. Pour about a cup of warm tap water into a glass and quickly add to the pan at the bottom of the oven, then close the door and leave it closed - the steam will help develop a much better crust.

Bake for 20 minutes or until golden brown. Remove from the oven and let cool on a cooling rack for at least 30 minutes before cutting into it and probably eating the whole thing in one sitting!

You don't have to wash the container when you run out of dough - just start anew and the small pieces of old dough will help develop a more complex taste for the next batch. Not quite like a sourdough starter, but not far off.

19 March 2009

Pi(e) Day


Nerd alert! Last Saturday was 3.14.09 - 3.14 is, as I hope you all know, also known as Pi Day. Jacquie and I had some people over, made some pies and watched the movie Pi. I made an apple pie (Alton Brown's recipe), a mixed berries pie and a quiche with broccoli, chicken and fontina cheese. All three came out splendidly (the quiche went in two minutes, the apple pie was almost finished, then everyone was too full) and good times were to be had.

For the mixed berry pie and the quiche, I decided to just use a pre-made crust. For the apple pie, things got slightly more advanced.

Alton Brown's Apple Pie

For the crust:

6 oz unsalted butter
2 oz vegetable shortening
5 to 7 tbsp apple jack (or apple brandy)
12 oz all purpose flour
1 tsp table salt
1 tbsp granulated sugar

For the filling:

3 lb apples, a mix of Granny Smith, Honeycrisp, Breaburn, Golden Delicious or whatever else you can find - try to mix them up (tart, sweet, different textures)
3 tbsp tapioca flour
2 tbsp apple jelly
1 tbsp apple cider
2 tsp freshly squeezed lime juice (the juice of 1/2 lime, more or less)
1/4 tsp kosher salt
1/4 tsp ground grains of paradise

Start with the dough for the crust. Bring out your favorite food processor and combine flour, salt and sugar. Pulse a few times. Add the butter and pulse 3-4 times, until combined. Add the shortening and pulse 3-4 times again, until the mix looks mealy and everything is incorporated. Now add 5 tablespoons of apple jack and pulse another 5 times. Add more apple jack if needed, until dough holds together when squeezed. Weigh the dough, remove half and shape into a disc, cover with plastic wrap and place in the fridge. Repeat with the other half of dough. You want to leave this at the very least for 1 hour, or up to overnight.

Next, let's do the filling. Peel and core the apples. Slice into 1/2 inch wedges - about 8-12 wedges per apple, depending on size. Toss with 1/4 cup sugar and place in a colander set over a bowl. Let drain for 1 1/2 hours. Once drained, move the liquid to a saucepan and place over medium heat until reduced to 2 tablespoons. Set aside to cool.

Toss the apples with the tapioca flour, the remaining sugar, the jelly, cider, lime juice, salt and grains of paradise. If you cannot get grains of paradise, fret not and use caraway seeds instead (ground).

Next, preheat the oven to 425 degrees F. Remove a disk of dough from the fridge and place on a lightly floured piece of waxed paper. Sprinkle with some more flour on top of the dough and roll out into a 12-inch circle. Place into a 9-10 inch tart pan that is 2 inches deep, preferably with a removable bottom. Trim the edges. Set a pie bird in the center of the pan.

Place the apples in the unbaked shell in circles, starting around the edges, working towards the center and forming a slight mound in the middle of the pie, around the pie bird. Pour over any remaining liquid. Roll out the second piece of dough as you did with the first. Place the dough over the apples, pressing the pie bird through the dough. Press together the edges of the dough around the rim of the pie. Brush the top crust with the juice reduction, but be careful not to brush close to the rim of the pie, or it'll stick to the pan completely.

If you have a heating coil in the oven, place the pie on the bottom rack, preferably on a pizza stone. If your oven has a flat bottom, place the pie on a sheet pan on the floor of the oven. Leave here for 30 minutes, then transfer to the lower rack (or, if using a pizza stone, one rack higher but no longer on the stone) for another 20 minutes. Remove to a rack and cool for a minimum of 4 hours before carving.

If you were using a pan with a removable bottom, slide the pie out of the pan and carve around the pie bird.

Mixed Berry Pie

2 pieces of pie crust
15 oz blueberries (fresh if you've got them, frozen if you don't)
15 oz raspberries (same)
1/4 cup all purpose flour
1/2 cup sugar
2 tsp freshly squeezed lime juice (the juice of half a lime)
2 tbsp unsalted butter
1 egg
1/4 cup milk
cinnamon

This one is quick and simple, and absolutely delicious. Set your oven to 425 degrees F. Start by placing a piece of pie dough in a 9 inch pie form and trim any excess off the edges. Keep the excess dough if you want to decorate the final pie (more on that later). Next, combine the berries with the flour, sugar and lime juice in a large bowl. If you bought frozen berries, make sure they're at least somewhat thawed first. Stir the mixture around until the dry goods are soaked up by the berries and juices.

Add the berries to the pie crust, sprinkle with a little bit of cinnamon and cut up the butter into small bits. Next, let's make some egg wash: beat the egg in a small bowl or glass. Add the milk and beat to combine. Roll out the second piece of pie crust and brush the edge (about 1 inch into the crust) with the egg wash. Flip around and cover the dough - the egg was will glue the top crust to the bottom crust a little better than just squeezing the two pieces together. Lightly brush the top of the dough with some egg was, making sure there are no "puddles" anywhere. If you wish to decorate the pie, roll out any excess dough into a thin sheet, and use cookie cutters or a knife to make a pattern. A heart works well, I should have done the π sign, but didn't :)

Cut three slits in the top crust, to let out steam. Bake the pie in the middle of the oven for 20 minutes, then lower the oven heat to 350 degrees and bake an additional 30 to 40 minutes, or until the juices are bubbly and the crust is browned. Remove and let cool for at least an hour before carving. Serve with vanilla ice cream.

Chicken and Broccoli Quiche with Fontina Cheese

1 pie crust
1 large broccoli head
2 chicken filets, skinless & boneless
2 tbsp grated onion
1 cup whole milk
1.5 cup shredded fontina cheese
4 large eggs
salt
pepper
nutmeg

Turn the oven to 350 degrees. Place the dough in a 9 inch pie form and trim off any excess (the excess can be discarded). Prick with a fork and, once the oven has reached the appropriate temperature, bake for 5 minutes or until lightly browned. Remove and let cool.

Cut the chicken into small pieces, about 1/4-1/2 inches. Fry in a non stick pan with a little amount of vegetable or olive oil, until cooked through. I usually increase the temperature when they're almost finished and get a nice, brown surface to the chicken bits. Makes for more flavor without drying the chicken out.

Wash the broccoli and cut off the florets. The size is up to you, I generally leave the smaller florets as they are and cut large ones into two or four pieces. Place in a microwave safe bowl with a 1/4 cup water and cook in the microwave on high for 1 minute. Remove, and discard the water. Place the chicken and broccoli in the pie shell.

Beat the four eggs in a medium bowl. Add the milk, shredded cheese, 2 tsp salt, 1/2 tsp freshly ground pepper, 1/4 tsp nutmeg and the grated onion. Stir to combine, and pour over the chicken and broccoli in the pie crust. Make sure you do not overfill the crust - if you have too much batter, leave about 1/4 inch at the top.

Bake in the oven for roughly 1 hour, or until nicely brown and a knife inserted in the middle of the quiche comes out clean and it feels like it's set nicely. Let cool for 10-15 minutes before carving. Serve with a green salad.

10 March 2009

Bagels


Had I known bagels would be so easy to make, I would have attempted this way earlier. The process is like creating any kind of bread, really, with the added step of placing the uncooked bagels in boiling water for a few minutes. This is what creates the harder crust and the spongy interior, which makes bagels so good, so good.

Bagels

3.5 cups all purpose flour
1.25 cups lukewarm water
1 tsp instant yeast
2 tbsp sugar
2 tsp salt

I make this in a stand mixer - if you're kneading by hand, make sure you have some good music, good company, good drinks or all three combined to make time fly by. Start by mixing the yeast and the sugar with the water - the water should be warm, but not hot. We're looking to awaken the yeast, not burn it to death. Once the yeast and sugar has dissolved completely, pour the flour into a large bowl (the stand mixer bowl, if using) and make a well in the middle. Add the liquid and incorporate some of the flour into it. We're looking to make a very loose batter, not an actual dough at this point.

Let this rest for 30 minutes - you'll notice that it gets very bubbly on top. Once the 30 minutes are up, add the salt and start kneading. If you're using the stand mixer, lube your dough hook up with cooking spray and knead for about 15 minutes. If doing by hand, mix everything up in the bowl and turn on to a floured working space. Knead for 30 minutes, without breaks! Breaks are for the weak. Oh, I'm just kidding.

Once the kneading is done, you should be able to "windowpane" the dough. Take a small piece and flatten it into a disc. Drag the edges, turning with each pull, and the center of the dough should be like a membrane, you should easily be able to see light through it. Here's an example of what that looks like.

Optional step: If you wish to make bagels with something in them, like cranberries or blueberries, now is the time to gently fold them into the dough.

Place the dough back in the bowl (or leave it in the bowl if you're using a stand mixer), cover loosely and let rise for about 1 hour or until doubled in size. Once done rising, turn the dough back out on the floured work surface and divide it into 8 equally large parts. Now it's time to form bagels - either make a lump and poke a hole in the middle, or roll the lump out into a roll and join the ends together. Either way works. Place the bagels on a baking sheet and cover again.

Turn the oven to 400 degrees F. Put water, a large pinch of salt and a large pinch of sugar in a large pot and place over high heat on the stove, until you achieve a rolling boil. Once the water is boiling, your bagels should have risen enough - you're looking to have them increase about 50% in size. Now put as many bagels as you can fit in one layer in the boiling water. Leave for one minute, then flip them over and leave for another minute. Place back on the sheet and repeat this step until they are all nice and cooked.

Optional step: at this point, you can top the bagels with whatever you see fit. Grated cheese works well, coarse sea salt is awesome (make sure you push the salt into the bagel lightly, don't squeeze all the air out of it!) and a mix of red onion and cheese is great too. Sesame seeds, poppy seeds, hell, maybe I should try something sweet on there at some point too.

Bake the bagels in the oven for 20-25 minutes or until golden brown. If you're a thermometer lover, they need to be about 210 degrees F on the inside to be done.

Let rest on a baking rack for at least 10 minutes. They freeze exceptionally well - I generally thaw on "3" in the microwave for 1 minute and the toast them in a normal toaster. If not frozen, they won't last 24 hours - share 'em (with me)!

08 March 2009

Scotch Pancakes Revisited


I made the pancakes in the video in this post and they turned out better than I could have imagined. It's not the lightest of breakfasts, but the caramel sauce, the bananas (and I don't really like bananas) and the ice cream just works together so well, the pancakes are extremely light and fluffy...yum. I think I'll have to make some this weekend again!

Scotch Pancakes with Caramel Bananas and Rum

3.5 oz (100g) all purpose flour
1 tsp baking powder
pinch of sea salt
1/3 cup (80 ml) buttermilk
1/5 cup (50 ml) cold water
2 large eggs
sunflower oil for frying

4 large, ripe bananas
1.75 oz (50g) sugar
1.75 oz (50 g) unsalted butter
rum
2 tbsp water
vanilla ice cream for serving

Start by making the pancake batter. Weigh the flour and sift it into a bowl together with the baking powder. Mix together the water and buttermilk in a separate container. Add the salt to the flour, make a well in the middle and add about half of the buttermilk mixture and the two (beaten) eggs. Mix until you have a smooth batter, then add the rest of the buttermilk mixture.

Put about a tablespoon of oil in a large, non-stick frying pan over medium high heat. Use some kitchen paper to evenly coat the pan with the oil. Using a small ladle, pour some batter into the pan - if the pan is large enough you should easily be able to make two pancakes at once. Flip after about a minute and cook another 45 seconds on the other side. The pancakes should be browned and puff up slightly.

Peel the bananas and slice them lengthwise, you're looking to make about 1-inch long pieces, about 1/3 inch thick. Add the sugar to a non-stick frying pan over medium heat. Let the sugar melt without touching it - once it's melted, let it brown slightly before adding the butter. Stir to combine, then add the bananas. Let cook for about two minutes, or until the bananas are just tender. At this point, add a good splash of rum and light it - be careful, watch your eyebrows and the kitchen furniture. Once the rum, has burned and most the alcohol has evaporated, add about two tablespoons of cold water and cook for another thirty seconds or so.

Serve the pancakes on a plate with some bananas on top, add ice cream and drizzle with some of the caramel sauce. Eat immediately.

03 March 2009

Brazilian Vegan Stew

I am definitely not a vegan. As a matter of fact, I eat a lot of meat and I love pretty much all kinds of food - I'd hate to deny myself things like chicken, fish, eggs, cheese (oh, cheese), beef, pork and all the other foods out there. Now and then, however, I come across a recipe that just begs me to make it, and this Brazilian stew that just happens to be vegan (and extremely healthy, and filling at that) was one of those recipes.

Brazilian Stew

2 sweet potatoes
1 red pepper
1 sweet onion
3 cloves garlic
1 can diced tomatoes
2 cans black beans (or any beans you'd like, just not baked!)
1 ripe mango
fresh cilantro (that's coriander outside the US - here, coriander is the seeds that grow the plant)
tortillas
vegetable oil
salt
pepper
1/2 tbsp Tabasco (optional)

Start by chopping the onion and mincing the garlic. In a large pot, add about two tablespoons of oil and place over medium high heat. Add the onion and garlic, cook for a few minutes. Chop the sweet potato into half-inch cubes. Add to the pot and stir. Remove the seeds and chop the red pepper into half inch pieces and add to the pot. Add the tomatoes and stir. Cover with a lid and let cook for about 15 minutes or until the sweet potatoes are getting soft. Make sure you stir now and then, to prevent burning. If it appears too dry, add a few tablespoons of water. At this point, it's a good opportunity to fight with the mango - try to get as much meat from it as possible. Here is a good guide!

Once the sweet potatoes are soft, add the beans to the pot, stir and let cook for about two minutes. Salt and pepper to taste, and add Tabasco if you wish. Remove from the heat and stir in the mango. Serve immediately with warm tortillas (I generally heat them on high in the microwave for 15 seconds) and sprinkle with the fresh cilantro.

This meal will make a lot more food than you'd expect and it's very filling. I usually have enough for three meals for two people...so if you're just looking to have a smaller meal for perhaps 4 people, remove one can of beans and one sweet potato from the recipe.

25 February 2009

Shrimps with White Wine and Feta


I love shrimps. Jacquie loves shrimps. Thus: we eat a lot of shrimps. I can't remember how I figured out this particular meal out - most likely I found the recipe somewhere and changed a few things around to make it better (or at least different). It's quick, easy and extremely flavorful.

Shrimps with White Wine and Feta

3/4 lb raw shrimps
1/2 red onion
3 cloves garlic
16 oz feta cheese
1/2 cup dry white wine
1 small bunch fresh parsley
1 small package of spaghetti
salt
black pepper

Start by bringing water in a large pot to a boil. Add a tablespoon of salt, then boil the pasta according to the instructions on the package - you're looking for al dente. Once boiled, drain and return to the pot. Next, peel and de-vein the shrimps, then set aside. Peel and chop the onion, peel and mince the garlic. Over medium heat, add a few tablespoons of cooking oil (or olive oil if you prefer that) and sauté the onions. Add the garlic after a couple of minutes, to prevent them from burning (as they will cook much quicker than the red onion). Once they are translucent and smell absolutely wonderful, add the shrimps. Cook the shrimps until just pink, then add the white wine. Stirring occasionally, cook until the shrimps are cooked through, about 3-4 minutes.

Crumble the feta cheese and finely mince the parsley (I usually put it in a coffee cup and go to town with a pair of scissors). Once the shrimps have finished cooking, pour the sauce over the pasta. Add the cheese and parsley. Toss and serve immediately.

24 February 2009

23 February 2009

More Cookies

I made cookies recently, and decided to try again but with a slight variation. Instead of dark chocolate chip cookies, I made them with white chocolate chips and macadamia nuts. I decided to mix up some cocoa in the batter to give them some color instead of having light cookies with white dots of chocolate and nuts in them. Turned out great. Follow the previous recipe, but replace the chocolate chips with white chocolate chips, add about 1/3 cup macadamia nuts (crush lightly, we don't want huge chunks) and add 1/2 cup of baker's cocoa to the batter. Yum yum.

22 February 2009

Salsa Chicken Tortillas with Guacamole


I found a recipe for the slow cooker that is amazingly simple and the end result is pretty freaking awesome. Served on a tortilla with some homemade guacamole and shredded cheese, I can't believe it takes all but ten minutes to whip this up, including the time it takes to make the guacamole but naturally not including the 6-8 hour cooking time in the slow cooker.

If you do not have a slow cooker, it can easily be made in a dutch oven or similar, just shorten the cooking time to 1 hour and cook on medium heat.

Salsa Chicken

4 boneless, skinless chicken breast fillets (preferably with rib meat, not thinly sliced)
1 large can of salsa

Yes, making your own salsa will most likely make this recipe far better, but this isn't haute cuisine we're talking here - this is a simple, middle of the week, comfort food sort of recipe that is so easy to prepare on a day when you have no time or energy to actually cook (rarely for me, but still). Trim excess fat off the chicken. Place the whole pieces in the slow cooker. Dump the salsa on top, making sure to cover the chicken. Cook on low for 6-8 hours. The chicken should be cooked through and be shredable, but not dry.

Guacamole

3 ripe avocados
1 medium tomato
1/4 white onion
1 lime
salt
pepper

Make sure the avocados are ripe - they should be soft, but not mushy. You'll have a hell of a time getting the fruit out of the shell if they're too hard or too soft (but too soft is preferable over too hard). Place the avocado in a bowl. Finely mince the tomato and onion. Discard the tomato pulp, you only want to keep the meatier parts. I leave the skin on the tomato, you can peel it if you want to. Add the onion and tomato to the avocado. Cut the lime in half and squeeze the juice over the mix, making sure no seeds from the lime find their way into the bowl. Mash together, salt and pepper to taste.

If you wish to make the guacamole spicy, do not add Tabasco sauce. Tabasco is vinegar based and you do not want to introduce that element to your guac! I suggest a hot sauce made from chilis or - why not - a fresh jalapeño. Your choice!

Once your chicken and your guacamole is finished, heat a tortilla according to the instructions on the packaging (unless you make your own, but that's something I'll save for another day), add salsa chicken, grated cheese (anything goes, cheddar is great for this though) and guacamole. Wrap up, consume. Goes great with a light Mexican beer like Corona or Dos Equis.