Showing posts with label sauce. Show all posts

09 March 2014

Steak au Poivre


I could probably eat steak every day. I know red meat isn't great for you and it would get pretty expensive (I only buy "good" meat from stores like Whole Foods because they are strict with what kind of treatment the animals received). There's just so much you can do with a good steak - from just grilling or frying it and serving it as is to slicing it up and putting it on a bed of salad to grinding it and making burgers. I could probably deal with being a vegetarian if I felt so inclined, but I think I would miss eating steak the most.

So, I decided to make steak. "Steak au poivre" means "pepper steak" in French, and, boy, there's a lot of pepper on this thing. It's earthy and a little spicy, but, thanks to the sauce, it's creamy, delicious, and just heavenly. I served it with mashed potatoes and oven roasted asparagus. I would also recommend oven roasted potatoes or pretty much any roasted root vegetable. The recipe below is for one person; double the quantities for two and so on.


Steak au Poivre

1 piece of steak (I used a New York strip but a filet or rib eye will do just fine)
1 tbsp black pepper
1/4 cup brandy
1/2 cup heavy cream
1 tbsp butter
1 tbsp canola oil
salt

1. An hour before cooking, remove your steak from the fridge. Remove any big pieces of fat, salt liberally on all sides, and let rest at room temperature. Yes, your steak will be fine for an hour, but don't leave it out much longer than that.

2. Once the hour is almost up, crush the peppercorns with a mortar and pestle (or something heavy, like a frying pan) until coarse - we want large pieces, not ground pepper. Spread the pepper on a plate and coat the surface of both sides of the steak by pressing it into the pepper.

3. Over medium heat, melt the butter and oil in a cast iron skillet until it starts turning golden. Add the steak and don't touch it for four minutes. Flip, and cook another four minutes without touching it for medium rare, depending on the thickness of your steak.

4. Remove the steak to a plate and cover loosely with foil. Pour off the grease from the pan, trying to not lose any of the residual pepper.

5. With the pan off the heat (this is important), add the brandy. Light the brandy with a match (trying not to singe your eyebrows in the process) and let the flames die down. Add the cream to the pan, turn the heat back on, and set to medium low. Cook for about three minutes or until the sauce thickens slightly.

5. Add the steak back into the sauce and coat with the sauce. Place the steak on a plate with whatever side dishes you opted for and pour the remaining sauce over it. Devour.

19 January 2011

Halibut in Lemon Butter Sauce with Pan Fried Potatoes and Cucumber Salad

While I never say "no" to a good steak, I do love me some fish and seafood as well. One particular craving for a delicacy of the seas set in the other day, and I decided to make some halibut.

Halibut in Lemon Butter Sauce with Pan Fried Potatoes and Cucumber Salad

1 lb halibut fillet (or other firm-fleshed white fish)
1 lemon
3 tbsp unsalted butter
1/2 cup dry white wine
2 shallots
1 tsp red pepper flakes
1 cucumber
1 lime
chives
extra virgin olive oil
1 lb firm potatoes
peanut oil (or other vegetable oil)
paprika powder
salt
pepper

Turn the oven to 400 degrees F. Next, start preparing the potatoes. Wash them and dice them into half-inch cubes. Add a few tablespoons of peanut oil to a large cast iron pan and place over medium high heat. Add the potatoes, sprinkle with salt and paprika, and fry, stirring frequently at first (to prevent sticking), until golden brown and delectable. Add freshly ground black pepper when finished.

While the potatoes are cooking, wash the fish and dry with paper towels. Place in a large, oven-proof skillet. Peel and chop the shallots. Remove about a teaspoon of zest from the lemon, then cut it in half. Top the fish with the shallots and dot it with the butter. Squeeze the lemon over the fish, pour the wine into the pan (to the side of the fish, to prevent washing away the "toppings"), and sprinkle with the red pepper flakes. Place over high heat until the liquid is boiling, then place in the center of the oven for about 10 minutes or until cooked through. If you use a particularly thick cut of fish (like halibut), you may have to cook it for 15 minutes instead.

While the fish is cooking and the potatoes are finishing, prepare the cucumber salad. Slice the cucumbers fairly thinly, then cut them into very small squares. Chop the chives finely (I used about 8 pieces). Place the cucumber in a bowl, and add a tablespoon of olive oil, the juice of the lime, the chives, and a little bit of salt. Stir to combine and keep chilled in the fridge until ready to serve.

Once the fish is finished, remove it from the pan and place it on a plate. Place the pan back over high heat and cook the sauce for a minute or so until it thickens a bit. If most of the liquid has evaporated in the oven, add a little more wine. Slice the fish into portions, then pour the sauce over it. Serve with the potatoes and cucumber salad.

25 March 2010

Fish and Chips

I try to eat something healthy once in a while, and this is not it. Fish and chips is definitely one of my all-time favorite meals, and having a deep fryer (albeit a toaster-sized one) in the kitchen is great. Messing with a heavy-bottomed pot and thermometers and trying to keep the temperature constant on an electric range is not my idea of a good time. If you have a gas range, you may have more luck doing so, but this meal really calls for a proper deep fryer. I recommend using peanut oil to fry the food, but safflower will work fine as well. If you want to serve this the way it's done in fish and chips shops in Britain, you'll want to use a folded up newspaper. I prefer the plate because ink and food do not go too well together.

(I apologize for not posting this yesterday - I had it all written out and forgot to actually publish it!)

Fish and Chips

1 lb firm-fleshed white fish - cod is recommended
2 large baking potatoes
1.5 cups unbleached all purpose flour, divided
1 bottle (12 fluid ounces/355 ml) dark or amber beer, cold
1 tsp salt
1 tsp black pepper
1 tsp baking powder
1 tsp paprika powder
peanut oil for frying
lemon wedges for serving
lettuce for service (optional)
tartar sauce (recipe below)

Begin by washing the potatoes and cutting them into uniform pieces. The thickness is up to you - I made mine about 1/2 inch thick and 3 inches long. Place in a bowl filled with cold water. Heat the oil to 325 degrees F. Pat the potatoes completely dry before frying to avoid splatter. Cook the potatoes in small batches for about 2 minutes, until pale and floppy. Remove to a plate lined with paper towels. Repeat with the other batches until all of the potatoes are done.

Turn the oven to 250 degrees F.

In a large bowl, stir together 1 cup of the flour, the baking powder, the salt, the pepper and the paprika. Add the beer and whisk until smooth. Refrigerate for at least ten minutes.

Increase the temperature of the oil to 375 degrees F. In small batches, fry the potatoes until cooked through and golden brown, about 3 minutes. Remove to a paper-lined plate, then transfer to a baking sheet and keep warm in the oven while finishing the rest of the food. Repeat until all the potatoes are cooked.

Remove the batter from the fridge. Cut the fish into chunks, roughly 2 by 5 inches. Put the remaining half cup of flour on a plate. Dip the fish strips in the flour, then in the batter. Fry until golden and cooked through, about 3 minutes. Make sure you do not overcrowd the oil. If you need to fry the fish in batches, transfer the cooked fish to the baking sheet in the oven, to keep warm.

Serve with lemon wedges, tartar sauce and some lettuce. If there are leftovers, you can reheat them in a 350 degree oven for about 15 minutes (but this dish is definitely best eaten fresh out of the fryer).

Tartar sauce

1/2 cup mayonnaise
2 tbsp pickles
1 tbsp white wine vinegar
1 tbsp capers
1 tsp coarse-grained mustard
salt
black pepper

Start by cutting the pickles into small pieces. Place all the ingredients in a food processor and pulse until the pickles are finely chopped and everything is mixed well. Keep in the fridge and use within a week.

15 September 2009

Swedish Meatballs


Being Swedish, I can't believe it took me over 40 posts to finally post a recipe for Swedish meatballs! These are a modified recipe of my mom's meatballs (who else?) and are perfect for children as well as adults. In Sweden, meatballs are generally served as a kid's dish and they're usually a huge hit on the smorgasbord for Christmas. These have a slightly more "adult" taste.

When I was working in the kitchen of a bar outside of Paris (The Bitter End in St Germain-en-Laye), I made them and they became an instant hit. After that first try, I basically had to make them as the daily special every Wednesday! The main reason I'm posting right now is because someone I used to work with at that bar was checking out this blog for the first time and was wondering where the meatballs were at!


Meatballs can be made as almost "thin" food (by using water and low fat meats) or, even more delicious, as a decadent meal that you probably shouldn't be eating on a daily basis (by using cream for both the meatballs themselves and the pan sauce.) The below recipe is the more decadent kind, but I have commented what to substitute if you want a leaner dish. I served this with my creamy mashed potatoes, but the original dish is generally served with boiled potatoes or some form of pasta.

Swedish Meatballs with Mashed Potatoes and Cream Sauce

Meatballs:

1 lb ground beef (I use 7% fat which seems to work well)

5 oz ground pork
1/2 cup breadcrumbs
2/3 cup heavy cream
1 egg
1 large yellow onion
3 tbsp butter
white pepper
kosher salt

"Stock" and Sauce:

beef or veal stock (preferably homemade, or a reduced broth - dried will work)
1 carrot
1/2 yellow onion
2 bay leaves
4 garlic cloves
~10 oz heavy cream
corn starch
soy sauce

Mashed Potatoes:

6 large potatoes
1/3 cup sour cream
white pepper
kosher salt

Lingonberry jam for serving (available at IKEA all over the world)

Begin by bringing 1/2 gallon of water to a rolling boil. Add the carrot, half onion (cut up in chunks), bay leaves, garlic cloves (smashed and peeled) and the stock. If you're using homemade, well-reduced stock, about 1/4 - 1/3 cup will be enough. If using dried bullion, about 1.5 - 2 tablespoons should be enough. Let this boil (without a lid) while making the meatballs.

Peel the potatoes and cut them up into chunks (for faster cooking). Pour water into a large pot, add the potatoes and a pinch of salt and bring to a boil over high heat. I generally keep them covered while boiling; just keep an eye on the pot if you do the same.

For the meatballs, start by mixing the cream (this can be replaced by water for a leaner meal) and the breadcrumbs in a large bowl. Let stand for ten minutes. In the meantime, very finely cut the onion. I used a very fine grater for this - it basically turned the onion into a mush, which is fine. You don't want large chunks of onion in the meatballs. Once the breadcrumbs and cream have stood for ten minutes, add the ground beef, ground pork, 1 teaspoon white pepper, 1 teaspoon kosher salt, the onion and the egg. I wear latex gloves for the next step - if you do not have any available, make sure you have some cold water in a bowl to dip your fingers in.

Mix the ingredients well with your hands. Once there are no chunks of the breadcrumb mix left, you're ready to start rolling. Make meatballs around an inch to an inch and a half in diameter and place them on a plate.

Turn the oven to 250 degrees F. Place about 5-6 meatballs in the pot of boiling "stock" and leave for about 3 minutes. Most of the meatballs should start floating (but if they do not, don't let them stay in the pot for more than 3 minutes). Remove with a slotted spoon and place on a plate covered with a paper towel. Once you've cooked all the meatballs, let the water continue cooking. In a large pan (I prefer cast iron, but nonstick or stainless steal will work fine), melt the butter over medium heat. Add about ten meatballs and cook until they have some surface color. Be careful not to burn them. Once a batch is done, place in an oven-safe dish and place the dish in the oven. Repeat until all the meatballs are done.

Once the potatoes are cooked, drain and put back into the pot you boiled them in (or a bowl). Mash them with a fork or potato masher. Add about a teaspoon of white pepper and the sour cream, then stir to combine. Keep warm by placing a lid on top (mashed potatoes will also reheat well in the microwave if need be).

The final step is the sauce. If there's very little to no fat left in the pan you cooked the meatballs in, add a tablespoon or two of butter. Add about a tablespoon of corn starch and stir with a whisk or wooden spoon, removing brown bits from the pan. Next, bring out a mesh strainer and pour the "stock" into the pan. You'll need about a cup of the stock. Whisk together and add the cream (if you wish for a leaner meal, you can replace the cream with more stock, water or red wine) and about two tablespoons of soy sauce - make sure you taste it, soy sauce is salty! Whisk and let cook for a minute or two. Salt and pepper to taste.

Remove the meatballs from the oven, place on a plate and smother with the sauce. If you're using boiled potatoes instead of mashed, make sure they get a dose of the sauce as well! Serve with the lingonberry jam and eat immediately.

Hmm, I wonder if I should go have seconds now...

08 June 2009

Pasta salad


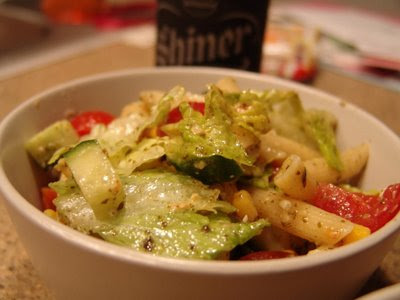
Yes, yes, I know that was more than a couple of weeks. I didn't forget about the blog, I was just crazy busy. Now I'm not...actually, that's not true, but at least I've decided to take the time to start updating the blog again! It's right around 100 degrees F out there (that's ~38 degrees C), so I thought a nice, cool salad would be a good idea. I've always had a special place in my heart (stomach) for pasta salads, and here's a pretty simple one that always leaves me hungry for more. For more substance, add some cold, cooked chicken and crumbled bacon - but this sucker is actually vegetarian in the original recipe, that follows (crazy, right?)

Pasta Salad

1 package (16 oz) penne pasta
15 cocktail tomatoes
1 cucumber
1 can corn (or 2 fresh corn cobs, cooked with the corn removed from the cob)
1/2 head romaine lettuce
8 oz feta cheese, crumbled
pesto sauce

Boil the pasta until al dente. Drain and let cool. Wash and shred the romaine lettuce. Wash and quarter the cocktail tomatoes. Wash, then dice the cucumber. Drain the corn (if using a can), or wash the cobs, remove the kernels and cook them (most recipes call for a non-stick pan with a little bit of oil over medium heat until the corn is cooked). Put the cooked and now cooled pasta in a large bowl. Add about five tablespoons of pesto sauce (recipe follows below, or you can buy a jar at the grocery store) and stir until all the pasta is covered. Add the rest of the ingredients and mix until combined. If you wish, add cooked, sliced chicken or turkey and crispy, crumbled bacon to the mix at this point.

Serve with freshly baked bread and a cold beer on a sunny patio (unless it's friggin' 100 degrees out, you want the shade then) for optimum results.

Pesto Sauce

2 cups fresh basil leaves (packed)
1/4 cup grated fresh Parmigianio Reggiano
1/2 cup extra virgin olive oil (use the good stuff if you have it)
3 tbsp pine nuts
3 garlic cloves, finely minced

You'll need a food processor for this. Start by placing about a third of the basil leaves in the processor and blend until finely chopped. Add a third of the garlic and a third of the nuts and blend again. Add a third of the cheese and a third of the oil, and blend again. Once it turns into a paste (you may have to scrape the sides of the bowl). Empty the bowl, then repeat the process until you've used all the ingredients. Combine the batches. This will last about a week in the fridge, a few months in the freezer. If you're not making pasta salad, it works really well if you just add it to freshly boiled pasta. I used to heat it with a little bit of creme fraiche and serve over spaghetti, but it's crazy expensive and hard to get creme fraiche in the US and I wouldn't want to try it with sour cream. Heavy cream is probably a better bet.

16 February 2009

Chicken and Broccoli Alfredo


Fettuccine Alfredo (Fettuccine al burro e panna in Italy, although that is generally made without the cheese) is a relatively heavy dish, consisting of pasta tossed with butter, cream and cheese. It's apparently pretty unusual outside of the US, as I don't think I've ever had it in Europe but I've had very similar courses - unsurprising since butter and cream is pretty common in all Western cooking.

Today's recipe is an Alfredo from scratch, with chicken and broccoli. I opted for farfalle pasta instead of the more classic fettuccine. I like the way the farfalle looks and feels when you eat it, and it works well with the bite-sized chicken and broccoli.

Chicken and Broccoli Alfredo

2 1/2 cups farfalle pasta
1 large head of broccoli
3 chicken breasts, skinless, boneless
1 stick unsalted butter (1/2 cup)
2 cups heavy cream
3 garlic cloves
1/2 cup freshly grated Parmesan cheese
1/2 cup freshly grated mozzarella cheese
white pepper
kosher salt
olive oil

Turn your oven to 400 degrees F (200 degrees C). Cut the stem off the broccoli and discard. Place the broccoli florets in a bowl, add 2 tablespoons of olive oil and a couple of pinches of kosher salt. Toss to coat. Transfer the broccoli to a roasting pan. Once the oven is hot, roast the broccoli for 10 minutes - we're looking for it to be cooked but still have resistance.

Slice the chicken into strips, about half an inch wide. Fry the strips in a frying pan with a little bit of vegetable oil over medium high heat. Once cooked through and beginning to brown, remove the chicken from the heat and set aside.

Bring water in a large pot to a rolling boil. Add 2 tablespoons of salt. As soon as the water is boiling, cook one package of farfalle. Once cooked al dente, drain and leave until the sauce is ready.

Finely mince the garlic. In a medium sauce pan over medium high heat, melt the butter and add the garlic. Let cook for about a half minute, making sure the garlic does not brown at all. Add the cream and cook, stirring, for about three minutes. Add the Parmesan cheese and stir frequently until sauce has thickened, about 5 minutes. Add the mozzarella cheese, a couple of pinches of salt and about 1/2 teaspoon of white pepper (taste!), and cook another 2-3 minutes or until smooth. Add the chicken and broccoli and let cook until reheated (another minute should do the trick). Add the pasta and serve immediately.

02 January 2009

Pita Bread and Tzatziki


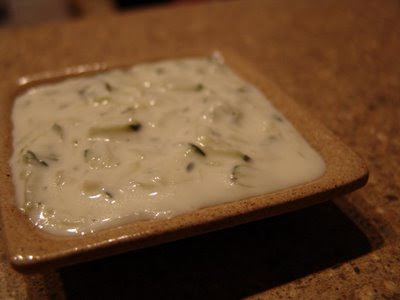
I went to a Greek/Mediterranean restaurant for lunch the other day and had a Gyro sandwich (unidentifiable meat in a pita bread with vegetables and a tzatziki sauce on the side). I'm happy to have located such a restaurant considering I love that sort of food and I didn't think I'd be able to locate something that tastes so authentically Greek in Austin. Since we decided to throw a New Year's Eve party and needed snacks, I figured I might as well make some tzatziki and pita bread from scratch. Here's a quick and simple recipe for pita bread and tzatziki. I use the stand mixer, of course, but it works well to knead by hand as well.

Pita bread

  • 1 package (2 1/4 tsp) quick-rising yeast
  • 3 - 4 cups flour
  • 1 tsp salt
  • 1 1/4 cup hot water (but not too hot)
  • 1 tbsp olive oil + 1 tbsp for coating
Put the yeast, 2 cups of the flour, the salt, the water and 1 tbsp of oil in a large bowl. Mix until fully incorporated, then add flour until you have a soft and relatively sticky dough. Turn onto a floured board and knead for 5 minutes. Lightly coat a bowl with oil and place the dough in the bowl, turning it to cover. Next, cover with a kitchen towel and leave in a warm place for 2 hours, or until doubled in size.

Turn your oven to 450 degrees Fahrenheit (230 degrees Celsius).

Once the dough is done rising, turn it out onto a floured board again and punch the air out. Divide into 8 equally sized pieces and form little balls. Roll each ball out into a circle, about 1/4 inch thick (be careful not to handle it too much at this point!), then place on a cookie sheet (lightly greased, or covered with baking paper). Place cookie sheet close to the bottom of the oven for 4 minutes, then turn and leave for another 4 minutes or until lightly brown.

Remove from oven and immediately cover in a kitchen towel for 4-5 minutes. Once this is done, gently press each pita bread to release the air from it, but be careful and do not do this once the bread has cooled completely. Store in zip lock bag - it will last 2-3 days in room temperature or a couple of months in the freezer. Makes for a great sandwich, just cut open and stuff with vegetables, beef, chicken or anything else you can think of.

Tzatziki

  • 16 oz Greek yogurt (or plain yogurt)
  • 2 cucumbers
  • 2 tbsp extra virgin olive oil
  • the juice of 1/2 lemon
  • 5 - 10 cloves of garlic (to taste)
  • 1 tsp salt
If you were unable to find Greek yogurt, the first step is to place a coffee filter in a funnel, put the normal plain yogurt in the coffee filter and let drip (into a bowl!) for at least 12 hours in the fridge. This will remove most of the moisture from the yogurt, which is imperative. I did my latest batch with Bulgarian yogurt, which was a little too "wet" and I should have let it drip for 4-5 hours but I didn't have the time.

Once your yogurt is prepared (or if you're using Greek), start by carefully washing the cucumbers and then cutting them in half, lengthwise, and remove the seeds. Once removed, grab a grater and coarsly grate the cucumber into a bowl. Next, you need to remove as much moisture as possible from the cucumbers. One way is to place them in a (clean!) dish towel and squeeze it, but remember that it will be completely green when you're done and you may not be able to clean it completely. Don't use grandma's favorite towel, mkay? I generally just grab a handful of cucumber, squeeze it in the palm of my (clean!) hand and then place on paper towels. Once all the cucumber is done, place another paper towel on top and get rid of even more moisture.

Finally, the garlic. Peel and chop very finely (use a press if you have to, but...no, don't use a damned garlic press) is all you have to do.

Now, combine the oil and juice in a medium bowl. Add the yogurt and mix very well. Add the cucumber, garlic and salt. Stir well and taste - you may need to add some more salt. I generally add black pepper as well.

Garnish with a little parsley if you want to, or just eat it because that's what it's there for. Lasts a week in the fridge if well sealed. Does not freeze well.

Enjoy :)