27 March 2009
Artisan Bread in 5 Minutes a Day
I had read about it for months, I saw the show on TV and one day on the way back home from work, I decided to stop by the Container Store for some baking equipment. That's right, the Container Store! I got me a big plastic box with a lid, took it home, poured some yeast, water and flour in there, stirred it around for a minute and just a day later, I had beautiful, fresh bread. The cost, in dollars? About $0.50. The cost, in time? About 5 minutes. The prize? Let me tell you, not much smells as good as freshly baked bread, and when it took basically no effort and no time, it's almost too good to be true.
The "Artisan Bread in Five Minutes a Day" book by Jeff Hertzberg (an MD...uh) and Zoe Francois is supposedly great. I didn't buy it yet, I might, but for now I'm happy with the basic recipe, which is simpler than simple. Trust me.
You'll definitely need a big bucket, plastic box or...well, something like that. A pizza peel helps. A pizza stone is pretty much essential. Once you have these things, let's get to work.
(Basic) Artisan Bread
1 1/2 tbsp dry yeast
1 1/2 tbsp kosher salt
6 1/2 cups all purpose flour
3 cups lukewarm tap water
cornmeal for dusting
In a large, resealable container, mix the yeast with the lukewarm water (around 100 degrees F is fine). Once mixed together, add the salt and mix again. Next, add the flour. Stir with a wooden spoon, until just combined. Do not knead. Do not over-stir. Do not add anything else. This will be an extremely wet dough, and it's supposed to be! Close the lid and leave to fend for itself (raise) for about 5 hours in normal room temperature.
Now place it in the fridge, and leave at least overnight. The longer you leave it, the more complex the dough will get and the better the bread will taste. Two weeks is max, though, don't leave it longer than that.
Once you're ready to bake, liberally dust a pizza peel with cornmeal. Remove the container from the fridge, and sprinkle the area of dough you intend to use with all purpose flour - you're looking to remove about a grapefruit-sized ball of dough from the container. Dust your hand with flour, grab the dough and pull. Use a serrated knife to cut the dough loose. Next, shape a ball in your hand - you're looking to gently stretch the dough. Do not knead it! Stretch, turn a 1/4, stretch again. Repeat until you have a smooth ball. If it's very wet, use more flour to dust, but the flour is not supposed to be incorporated into the actual dough, just cover the surface.
Let the dough rest on the pizza peel for about 1h30m. They say 45 minutes in the book, I believe, but I find waiting twice that length of time is better. When 40 minutes remain, place the pizza stone in the middle of the oven, something that can contain water and won't break in the bottom of the oven (a cast iron pan or a broiler pan works fine), then turn your oven to 450 degrees. Once the 1h30 is up, slash the top of the bread three times with a serrated knife, to prevent exploding bread in your oven. Transfer to the pizza stone. Pour about a cup of warm tap water into a glass and quickly add to the pan at the bottom of the oven, then close the door and leave it closed - the steam will help develop a much better crust.
Bake for 20 minutes or until golden brown. Remove from the oven and let cool on a cooling rack for at least 30 minutes before cutting into it and probably eating the whole thing in one sitting!
You don't have to wash the container when you run out of dough - just start anew and the small pieces of old dough will help develop a more complex taste for the next batch. Not quite like a sourdough starter, but not far off.
19 March 2009
Pi(e) Day
Nerd alert! Last Saturday was 3.14.09 - 3.14 is, as I hope you all know, also known as Pi Day. Jacquie and I had some people over, made some pies and watched the movie Pi. I made an apple pie (Alton Brown's recipe), a mixed berries pie and a quiche with broccoli, chicken and fontina cheese. All three came out splendidly (the quiche went in two minutes, the apple pie was almost finished, then everyone was too full) and good times were to be had.
For the mixed berry pie and the quiche, I decided to just use a pre-made crust. For the apple pie, things got slightly more advanced.
Alton Brown's Apple Pie
For the crust:
6 oz unsalted butter
2 oz vegetable shortening
5 to 7 tbsp apple jack (or apple brandy)
12 oz all purpose flour
1 tsp table salt
1 tbsp granulated sugar
For the filling:
3 lb apples, a mix of Granny Smith, Honeycrisp, Breaburn, Golden Delicious or whatever else you can find - try to mix them up (tart, sweet, different textures)
3 tbsp tapioca flour
2 tbsp apple jelly
1 tbsp apple cider
2 tsp freshly squeezed lime juice (the juice of 1/2 lime, more or less)
1/4 tsp kosher salt
1/4 tsp ground grains of paradise
Start with the dough for the crust. Bring out your favorite food processor and combine flour, salt and sugar. Pulse a few times. Add the butter and pulse 3-4 times, until combined. Add the shortening and pulse 3-4 times again, until the mix looks mealy and everything is incorporated. Now add 5 tablespoons of apple jack and pulse another 5 times. Add more apple jack if needed, until dough holds together when squeezed. Weigh the dough, remove half and shape into a disc, cover with plastic wrap and place in the fridge. Repeat with the other half of dough. You want to leave this at the very least for 1 hour, or up to overnight.
Next, let's do the filling. Peel and core the apples. Slice into 1/2 inch wedges - about 8-12 wedges per apple, depending on size. Toss with 1/4 cup sugar and place in a colander set over a bowl. Let drain for 1 1/2 hours. Once drained, move the liquid to a saucepan and place over medium heat until reduced to 2 tablespoons. Set aside to cool.
Toss the apples with the tapioca flour, the remaining sugar, the jelly, cider, lime juice, salt and grains of paradise. If you cannot get grains of paradise, fret not and use caraway seeds instead (ground).
Next, preheat the oven to 425 degrees F. Remove a disk of dough from the fridge and place on a lightly floured piece of waxed paper. Sprinkle with some more flour on top of the dough and roll out into a 12-inch circle. Place into a 9-10 inch tart pan that is 2 inches deep, preferably with a removable bottom. Trim the edges. Set a pie bird in the center of the pan.
Place the apples in the unbaked shell in circles, starting around the edges, working towards the center and forming a slight mound in the middle of the pie, around the pie bird. Pour over any remaining liquid. Roll out the second piece of dough as you did with the first. Place the dough over the apples, pressing the pie bird through the dough. Press together the edges of the dough around the rim of the pie. Brush the top crust with the juice reduction, but be careful not to brush close to the rim of the pie, or it'll stick to the pan completely.
If you have a heating coil in the oven, place the pie on the bottom rack, preferably on a pizza stone. If your oven has a flat bottom, place the pie on a sheet pan on the floor of the oven. Leave here for 30 minutes, then transfer to the lower rack (or, if using a pizza stone, one rack higher but no longer on the stone) for another 20 minutes. Remove to a rack and cool for a minimum of 4 hours before carving.
If you were using a pan with a removable bottom, slide the pie out of the pan and carve around the pie bird.
Mixed Berry Pie
2 pieces of pie crust
15 oz blueberries (fresh if you've got them, frozen if you don't)
15 oz raspberries (same)
1/4 cup all purpose flour
1/2 cup sugar
2 tsp freshly squeezed lime juice (the juice of half a lime)
2 tbsp unsalted butter
1 egg
1/4 cup milk
cinnamon
This one is quick and simple, and absolutely delicious. Set your oven to 425 degrees F. Start by placing a piece of pie dough in a 9 inch pie form and trim any excess off the edges. Keep the excess dough if you want to decorate the final pie (more on that later). Next, combine the berries with the flour, sugar and lime juice in a large bowl. If you bought frozen berries, make sure they're at least somewhat thawed first. Stir the mixture around until the dry goods are soaked up by the berries and juices.
Add the berries to the pie crust, sprinkle with a little bit of cinnamon and cut up the butter into small bits. Next, let's make some egg wash: beat the egg in a small bowl or glass. Add the milk and beat to combine. Roll out the second piece of pie crust and brush the edge (about 1 inch into the crust) with the egg wash. Flip around and cover the dough - the egg was will glue the top crust to the bottom crust a little better than just squeezing the two pieces together. Lightly brush the top of the dough with some egg was, making sure there are no "puddles" anywhere. If you wish to decorate the pie, roll out any excess dough into a thin sheet, and use cookie cutters or a knife to make a pattern. A heart works well, I should have done the π sign, but didn't :)
Cut three slits in the top crust, to let out steam. Bake the pie in the middle of the oven for 20 minutes, then lower the oven heat to 350 degrees and bake an additional 30 to 40 minutes, or until the juices are bubbly and the crust is browned. Remove and let cool for at least an hour before carving. Serve with vanilla ice cream.
Chicken and Broccoli Quiche with Fontina Cheese
1 pie crust
1 large broccoli head
2 chicken filets, skinless & boneless
2 tbsp grated onion
1 cup whole milk
1.5 cup shredded fontina cheese
4 large eggs
salt
pepper
nutmeg
Turn the oven to 350 degrees. Place the dough in a 9 inch pie form and trim off any excess (the excess can be discarded). Prick with a fork and, once the oven has reached the appropriate temperature, bake for 5 minutes or until lightly browned. Remove and let cool.
Cut the chicken into small pieces, about 1/4-1/2 inches. Fry in a non stick pan with a little amount of vegetable or olive oil, until cooked through. I usually increase the temperature when they're almost finished and get a nice, brown surface to the chicken bits. Makes for more flavor without drying the chicken out.
Wash the broccoli and cut off the florets. The size is up to you, I generally leave the smaller florets as they are and cut large ones into two or four pieces. Place in a microwave safe bowl with a 1/4 cup water and cook in the microwave on high for 1 minute. Remove, and discard the water. Place the chicken and broccoli in the pie shell.
Beat the four eggs in a medium bowl. Add the milk, shredded cheese, 2 tsp salt, 1/2 tsp freshly ground pepper, 1/4 tsp nutmeg and the grated onion. Stir to combine, and pour over the chicken and broccoli in the pie crust. Make sure you do not overfill the crust - if you have too much batter, leave about 1/4 inch at the top.
Bake in the oven for roughly 1 hour, or until nicely brown and a knife inserted in the middle of the quiche comes out clean and it feels like it's set nicely. Let cool for 10-15 minutes before carving. Serve with a green salad.
10 March 2009
Bagels
Had I known bagels would be so easy to make, I would have attempted this way earlier. The process is like creating any kind of bread, really, with the added step of placing the uncooked bagels in boiling water for a few minutes. This is what creates the harder crust and the spongy interior, which makes bagels so good, so good.
Bagels
3.5 cups all purpose flour
1.25 cups lukewarm water
1 tsp instant yeast
2 tbsp sugar
2 tsp salt
I make this in a stand mixer - if you're kneading by hand, make sure you have some good music, good company, good drinks or all three combined to make time fly by. Start by mixing the yeast and the sugar with the water - the water should be warm, but not hot. We're looking to awaken the yeast, not burn it to death. Once the yeast and sugar has dissolved completely, pour the flour into a large bowl (the stand mixer bowl, if using) and make a well in the middle. Add the liquid and incorporate some of the flour into it. We're looking to make a very loose batter, not an actual dough at this point.
Let this rest for 30 minutes - you'll notice that it gets very bubbly on top. Once the 30 minutes are up, add the salt and start kneading. If you're using the stand mixer, lube your dough hook up with cooking spray and knead for about 15 minutes. If doing by hand, mix everything up in the bowl and turn on to a floured working space. Knead for 30 minutes, without breaks! Breaks are for the weak. Oh, I'm just kidding.
Once the kneading is done, you should be able to "windowpane" the dough. Take a small piece and flatten it into a disc. Drag the edges, turning with each pull, and the center of the dough should be like a membrane, you should easily be able to see light through it. Here's an example of what that looks like.
Optional step: If you wish to make bagels with something in them, like cranberries or blueberries, now is the time to gently fold them into the dough.
Place the dough back in the bowl (or leave it in the bowl if you're using a stand mixer), cover loosely and let rise for about 1 hour or until doubled in size. Once done rising, turn the dough back out on the floured work surface and divide it into 8 equally large parts. Now it's time to form bagels - either make a lump and poke a hole in the middle, or roll the lump out into a roll and join the ends together. Either way works. Place the bagels on a baking sheet and cover again.
Turn the oven to 400 degrees F. Put water, a large pinch of salt and a large pinch of sugar in a large pot and place over high heat on the stove, until you achieve a rolling boil. Once the water is boiling, your bagels should have risen enough - you're looking to have them increase about 50% in size. Now put as many bagels as you can fit in one layer in the boiling water. Leave for one minute, then flip them over and leave for another minute. Place back on the sheet and repeat this step until they are all nice and cooked.
Optional step: at this point, you can top the bagels with whatever you see fit. Grated cheese works well, coarse sea salt is awesome (make sure you push the salt into the bagel lightly, don't squeeze all the air out of it!) and a mix of red onion and cheese is great too. Sesame seeds, poppy seeds, hell, maybe I should try something sweet on there at some point too.
Bake the bagels in the oven for 20-25 minutes or until golden brown. If you're a thermometer lover, they need to be about 210 degrees F on the inside to be done.
Let rest on a baking rack for at least 10 minutes. They freeze exceptionally well - I generally thaw on "3" in the microwave for 1 minute and the toast them in a normal toaster. If not frozen, they won't last 24 hours - share 'em (with me)!
08 March 2009
Scotch Pancakes Revisited
I made the pancakes in the video in this post and they turned out better than I could have imagined. It's not the lightest of breakfasts, but the caramel sauce, the bananas (and I don't really like bananas) and the ice cream just works together so well, the pancakes are extremely light and fluffy...yum. I think I'll have to make some this weekend again!
Scotch Pancakes with Caramel Bananas and Rum
3.5 oz (100g) all purpose flour
1 tsp baking powder
pinch of sea salt
1/3 cup (80 ml) buttermilk
1/5 cup (50 ml) cold water
2 large eggs
sunflower oil for frying
4 large, ripe bananas
1.75 oz (50g) sugar
1.75 oz (50 g) unsalted butter
rum
2 tbsp water
vanilla ice cream for serving
Start by making the pancake batter. Weigh the flour and sift it into a bowl together with the baking powder. Mix together the water and buttermilk in a separate container. Add the salt to the flour, make a well in the middle and add about half of the buttermilk mixture and the two (beaten) eggs. Mix until you have a smooth batter, then add the rest of the buttermilk mixture.
Put about a tablespoon of oil in a large, non-stick frying pan over medium high heat. Use some kitchen paper to evenly coat the pan with the oil. Using a small ladle, pour some batter into the pan - if the pan is large enough you should easily be able to make two pancakes at once. Flip after about a minute and cook another 45 seconds on the other side. The pancakes should be browned and puff up slightly.
Peel the bananas and slice them lengthwise, you're looking to make about 1-inch long pieces, about 1/3 inch thick. Add the sugar to a non-stick frying pan over medium heat. Let the sugar melt without touching it - once it's melted, let it brown slightly before adding the butter. Stir to combine, then add the bananas. Let cook for about two minutes, or until the bananas are just tender. At this point, add a good splash of rum and light it - be careful, watch your eyebrows and the kitchen furniture. Once the rum, has burned and most the alcohol has evaporated, add about two tablespoons of cold water and cook for another thirty seconds or so.
Serve the pancakes on a plate with some bananas on top, add ice cream and drizzle with some of the caramel sauce. Eat immediately.
03 March 2009
Brazilian Vegan Stew
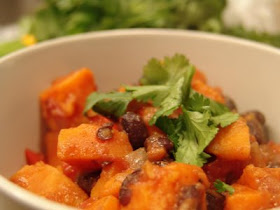
I am definitely not a vegan. As a matter of fact, I eat a lot of meat and I love pretty much all kinds of food - I'd hate to deny myself things like chicken, fish, eggs, cheese (oh, cheese), beef, pork and all the other foods out there. Now and then, however, I come across a recipe that just begs me to make it, and this Brazilian stew that just happens to be vegan (and extremely healthy, and filling at that) was one of those recipes.
Brazilian Stew
2 sweet potatoes
1 red pepper
1 sweet onion
3 cloves garlic
1 can diced tomatoes
2 cans black beans (or any beans you'd like, just not baked!)
1 ripe mango
fresh cilantro (that's coriander outside the US - here, coriander is the seeds that grow the plant)
tortillas
vegetable oil
salt
pepper
1/2 tbsp Tabasco (optional)
Start by chopping the onion and mincing the garlic. In a large pot, add about two tablespoons of oil and place over medium high heat. Add the onion and garlic, cook for a few minutes. Chop the sweet potato into half-inch cubes. Add to the pot and stir. Remove the seeds and chop the red pepper into half inch pieces and add to the pot. Add the tomatoes and stir. Cover with a lid and let cook for about 15 minutes or until the sweet potatoes are getting soft. Make sure you stir now and then, to prevent burning. If it appears too dry, add a few tablespoons of water. At this point, it's a good opportunity to fight with the mango - try to get as much meat from it as possible. Here is a good guide!
Once the sweet potatoes are soft, add the beans to the pot, stir and let cook for about two minutes. Salt and pepper to taste, and add Tabasco if you wish. Remove from the heat and stir in the mango. Serve immediately with warm tortillas (I generally heat them on high in the microwave for 15 seconds) and sprinkle with the fresh cilantro.
This meal will make a lot more food than you'd expect and it's very filling. I usually have enough for three meals for two people...so if you're just looking to have a smaller meal for perhaps 4 people, remove one can of beans and one sweet potato from the recipe.